Dog Santa Outfit Costume DIY (Free Knitting Pattern)
THIS ARTICLE CONTAINS AFFILIATE LINKS THAT SUPPORT HANDY LITTLE ME CONTENT AND FREE PATTERNS.This dog Santa outfit costume DIY is straightforward to knit and has an added belt.
Your furry friend will be warm and snuggly in his (or her) pet costume and ready for the holiday celebrations.
Scroll down to view the free pattern, or grab the printer-friendly ad-free PDF here.

Santa Claus Dog Coat Pattern
Skill Level – Easy (advanced beginner)
Notes
Knit something your dog can wear and woof at with excitement during the Christmas period, to be worn during family photos, and to impress your guests.
Dog Christmas outfits are just the thing for Santa’s little helpers and a great way to include your best friend in your holiday celebrations.
Dog costumes don’t just have to be for Halloween and can make a great gift for a pooch as an alternative or addition to toys and treats.
Copyright Info
- Please do not copy, sell, redistribute, or republish this pattern.
- If you wish to share this pattern, link to the pattern page only.
- You may sell items produced using this pattern.
- Do NOT use copyrighted photos for your product listing.
- For the copyright T&C, please read my Terms of Use.
Please note – when you knit the main body of the dog coat with two colors – you need to work it like this –
Row 1 – K4 in Yarn A, join in Yarn B – when you knit with Yarn B – pull the yarn under Yarn A and start knitting – and M1, cont to knit with Yarn B to the last 4 sts, M1, then join in Yarn A – put Yarn A underneath Yarn B and K4 sts.
*Please note – it is easier to have 2 skeins/balls of Yarn A at each end of the border if you want to have this in a contrasting color.
Row 2 – K4 sts in Yarn A, bring Yarn B and place it underneath Yarn A – Purl in yarn B to the last 4 sts, bring Yarn A underneath Yarn B, and Knit 4 sts in yarn A.

Video Tutorial
If you need help, please watch the video tutorial on my YouTube channel here.
Size Information
Gauge – 12 sts and 16 rows to 4×4 inches measured in stocking stitch.
Three different sizes – Small, medium, and large.
The first set of figures shown applies to the small size, then the medium, and finally the large.
Measurements in inches about –
- Width – (16, 21, 26)
- Back length excluding collar – (13, 17, 21)
This sweater has a wide variety of fits that will fit most breeds.

The Supplies You Need
Yarn
- 2 x Lion Brand Wool-Ease Thick and Quick in Red – Cranberry 138
- 1 x Lion Brand Wool-Ease Thick and Quick in White – Fisherman 99
- 1 x Lion Brand Wool-Ease Thick and Quick in Black – Black 153
- 1 x Lion Brand Wool-Ease Thick and Quick in Mustard – Mustard 158
- (Not a full skein is needed for the black and the gold, as the black makes the belt, and the gold makes the belt buckle. )
- Yarn weight – Super Bulky/Super Chunky/14 Ply / Yarn Weight Guide (+ Conversion Chart)
Needles
Notions
Other Materials
- 4 x buttons – I used black buttons that measure 1 inch in diameter.

Abbreviations / Knitting Abbreviations And Terms (US And UK) List
- Beg – beginning
- K – knit
- K2tog – knit two stitches together
- M1 – make one stitch
- P – purl
- Rem – remaining
- Rep – repeat
- RS – right side
- St(s) – stitch (es)
- WS – wrong side
- YO – Yarn over
Pattern Instructions
- Yarn A – White
- Yarn B – Red
- Yarn C – Black
- Yarn D – Mustard
- Cast on (26, 40, 54) sts in Yarn A and work 7 rows in garter stitch.
- Work in pattern for the body as follows;
- Row 1 – K4 in Yarn A, join in Yarn B and M1, cont to knit with Yarn B to the last 4 sts, M1, then join in Yarn A and K4 sts.
- *Please note – it is easier to have 2 skeins/balls of Yarn A at each end of the border if you want to have this in a contrasting color.
- Row 2 – K4 sts in Yarn A, Purl in yarn B to the last 4 sts, Knit 4 in yarn A.
- Rep the 2 rows above (3, 5, 7) times more.
- (Because you are repeating both rows this will equal double the amount of rows worked – for example – 3 (6), 5 (10), 7 (14).
- Then work (14, 22, 30) rows straight on these (34, 52, 70) sts.
- 1st shaping row – K4 in Yarn A, K2tog in Yarn B, K to last 4 sts, K2tog, in Yarn A K4 sts.
- Work (5, 3, 3) rows straight.
- Rep last (6, 4, 4) rows (once, twice, once) more.
- Next row – as 1st shaping row.
- Work 3 rows straight.
- Next row – as 1st shaping row.
- Work 1 row straight.
- Rep the last 2 rows (2, 5, 10) times more.
- (Because you are repeating both rows this will equal double the amount of rows worked – for example – 2 (4), 5 (10), 10 (20).
- Then proceed for the collar on these (22, 32, 42) sts.
- Next 2 rows – In Yarn A cast on (8, 10, 12) sts, K to end.
- Work 2 rows in garter stitch on these (38, 52, 66) sts.
- Next row – K to last 10 sts, YO, K4, YO, K4
- K 2 rows.
- Cast off loosely.
The Belt
- With Yarn C – Cast on (5, 7, 9) sts.
- Work in garter stitch until the belt is long enough to fit around the dog’s body, plus 1 inch for an overwrap.
- If you want to have a buttonhole (I have 2) knit until the belt wraps around the body, then…
- Small – K2, YO, K3, Medium – K3, YO, K4, Large – K4, YO, K5
- K 6 rows
- Small – K2, YO, K3, Medium – K3, YO, K4, Large – K4, YO, K5
- K 6 rows
- Cast off.
- If you do not want to use buttons, you can instead stitch press studs onto the belt.
The Belt Buckle
- The belt buckle is knit in 5 pieces and then seamed together.

- Make 4 pieces – In Yarn D, cast on 4 sts, Knit in garter stitch for 15 rows, and cast off.
- For the middle section – cast on 2 sts, knit in garter stitch 15 rows, and cast off.

- You can then feed the black belt through the buckle.

Making up
Stitch two buttons onto the collar so that the collar can fasten.
If you do not wish to use buttons or knit the buttonholes, press studs are an alternative.

Press the coat lightly on the wrong side with a warm iron over a damp cloth avoiding the garter stitch borders.
Sew the belt to the center back of the coat and fasten it with two buttons or press studs.


An Easy-Level Knitting Pattern
This is an easy pattern for those of you who are advanced beginner level, and the techniques you will need to know are knit, purl, and work with two colored yarns simultaneously.
Using mainly knit and purl stitches it simply decreases the shaping.
The dog coat has a different colored edging, which requires a little intarsia technique to do.

The Dog Christmas Sweater Sizes
This dog coat is available to knit in three sizes: small, medium, and large.
Measurements in inches about;
- Width: (16, 21, 26)
- Length excluding collar: (13, 17, 21).
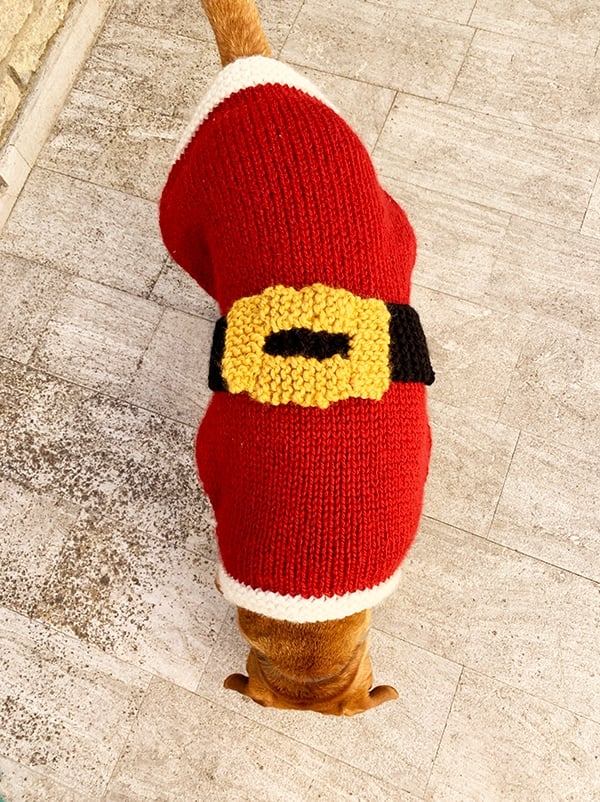
My dog Jason is wearing the large size in the photographs, as the medium was too small for him, and the large is just slightly big on his frame.
He is a medium/large-sized dog and weighs in at 23 kilos, so the large size was the right choice.
The Yarn I Used
- The dog Santa outfit has been knit on 9 mm (US 13) needles with super bulky yarn 06.
- The recommended yarn for this pattern is Lion Brand Wool-Ease Thick and Quick, or Hometown USA.
- Any super bulky yarn that can be used with the recommended needle size is acceptable.
- Not a whole skein is needed for the belt or the belt buckle.
- The main body of the coat is knit with two colors, white and red.
- The white yarn is knit in garter stitch and forms a border around the coat.
The Collar and Belt Fastenings
- The dog sweater is then fastened at the collar with two buttons.
- But if you do not want to use buttons, press studs are a good alternative.
- This is the same for the belt fastening.
- I used two black buttons, but press studs can be used again.
- If there is a chance your dog might try to chew off the buttons (*ahem* Jason!), press studs may be a safer option!
- The belt accessory is knit in one long piece, using garter stitch only.
- The belt buckle is knit in five pieces, four sides of the rectangle, and then a middle length.
- There are photographs in the pattern instructions below that will help you to create and assemble the belt buckle.

Is It OK For Dogs To Wear Costumes?
It can be okay for dogs to wear costumes, but it’s important to consider a few factors to ensure their comfort and safety:
Comfort:
- Ensure the costume is comfortable and doesn’t restrict breathing movement or cause discomfort. Look for soft, breathable fabrics that won’t irritate their skin.
Proper Fit:
- Choose a costume that fits well without being too tight or too loose. Avoid any parts that could become a choking hazard or restrict their vision or hearing.
Supervision:
- Always supervise your dog while they’re wearing a costume. Some dogs may try to chew or remove the costume, which can pose a risk of choking or ingestion.
Behavior:
- Pay attention to your dog’s behavior while wearing the costume. If they seem stressed, anxious, or uncomfortable, it might be best to forgo the costume.
Weather:
- Consider the weather conditions. Costumes with excessive layers or that are too warm can cause overheating, especially in warmer climates.
Acclimation:
- Introduce the costume gradually. Let your dog sniff and explore the costume before putting it on. Use positive reinforcement and treats to create a positive association.
Safety:
- Avoid costumes with small, dangling, or easily chewed-off parts that could be a choking hazard or cause injury.
Frequency:
- Limit the duration your dog wears the costume. Some dogs might be fine for short periods, like during a photo session, but might not be comfortable wearing them for extended periods.
Check for Signs of Discomfort:
- Watch for signs of distress such as panting excessively, trying to remove the costume, or behaving unusually.
Ultimately, every dog is different, and while some might enjoy dressing up, others may not feel comfortable.
Always prioritize your dog’s well-being and comfort when considering whether or not to dress them in a costume.
If your dog seems happy and relaxed in the costume, and you’ve taken the necessary precautions, then it can be a fun way to include them in festive occasions like Christmas morning.
More Dog Sweaters
If you want to see more dog jumpers for the cold winter, including sizes for large dogs, please take a look at these patterns;
- Cable Knit Dog Sweater Pattern
- Christmas Puppy Sweater Knitting Pattern
- Baby Yoda Pattern | Dog Sweater
- Dog Jumper Knitting Pattern – Rainbow Stripes
- Knitted Dog Sweater Pattern (3 Sizes)
- Large Dog Sweater Knitting Pattern
- Dog Sweater Knitting Pattern
- 20 Beautiful Fall Dog Sweater Knitting Patterns
- Dog Sweater Knitting Pattern Straight Needles
- Aran Dog Sweater Knitting Pattern
- Knitted Bow Tie (Free Stash Busting Knitting Pattern)
- Elf Dog Sweater Knitting Pattern (Free in 3 Sizes)
- Christmas Elf Dog Bandana Knitting Pattern (4 Sizes)

Free Knitting Patterns For Christmas
- Dog Christmas Hat Pattern
- Knitted Elf Hat Pattern
- Knitted Santa Hat
- Knit Tree Skirt Pattern (Free And Easy Christmas DIY)
- 28 Free Christmas Stocking Knitting Patterns (The Best)
- 30+ Free Christmas Knitting Patterns (Best Knitted Ideas)
- 30 Christmas Sweater Knitting Patterns
- 17 One Skein Knitting Patterns {Easy + Quick}
- 35 Free Knitted Christmas Decorations (Knitting Patterns)
- 27 Free Christmas Knitting Patterns For Babies
- 33 Free Christmas Knitting Patterns For Kids
- 13 Vintage Knitted Christmas Stocking Patterns
- Tartan Christmas Decorations (Plaid Knitting Pattern)
- The 50+ Best Free Knitted Gifts For Christmas
- Christmas Blanket Knitting Pattern (Free + Festive!)
- How To Make A Chunky Knit Pillow Cover- Free Pattern
- Holly Jolly Dishcloth Knitting Pattern (Free Printable)
- Candy Cane C2C Dishcloth (Free Printable Knitting Pattern)
- 17+ Nordic Knits For Christmas – Free Patterns
- 25 Free Knitted Christmas Baubles And Ornaments
- 15+ Free Knitted Advent Calendar Patterns
- Free Dog Hat Knitting Pattern (Bobble Hat With Ear Holes)
- Knitted Christmas Bauble Cover (Free Printable)
- 10 Free Christmas Tree Skirt Knitting Patterns
- Free Chunky Christmas Tree Skirt Knitting Pattern (Large Yarn)
- How To Make An Easy Pom Pom Christmas Tree DIY Craft
- How To Make A Christmas Wreath (Easy Homemade DIY)
- Christmas Tree Hat Knitting Pattern
- 47 Holiday Knitting and Crochet Patterns
- 44 Handmade Gifts – The Best Ideas For Everyone On Your List
Share your work with us…
I love seeing your finished projects on social media.
If you enjoyed making the new Santa costume, I’d love to see yours on Instagram, be sure to tag me @handylittleme.
I’d love to see your work.
Happy Knitting!
Jason bad business buttons are not for chewing lol lol 😉 Ava thinks so too….. so love your mommy’s idea of snaps <3