Carolina Crochet Fingerless Gloves Pattern
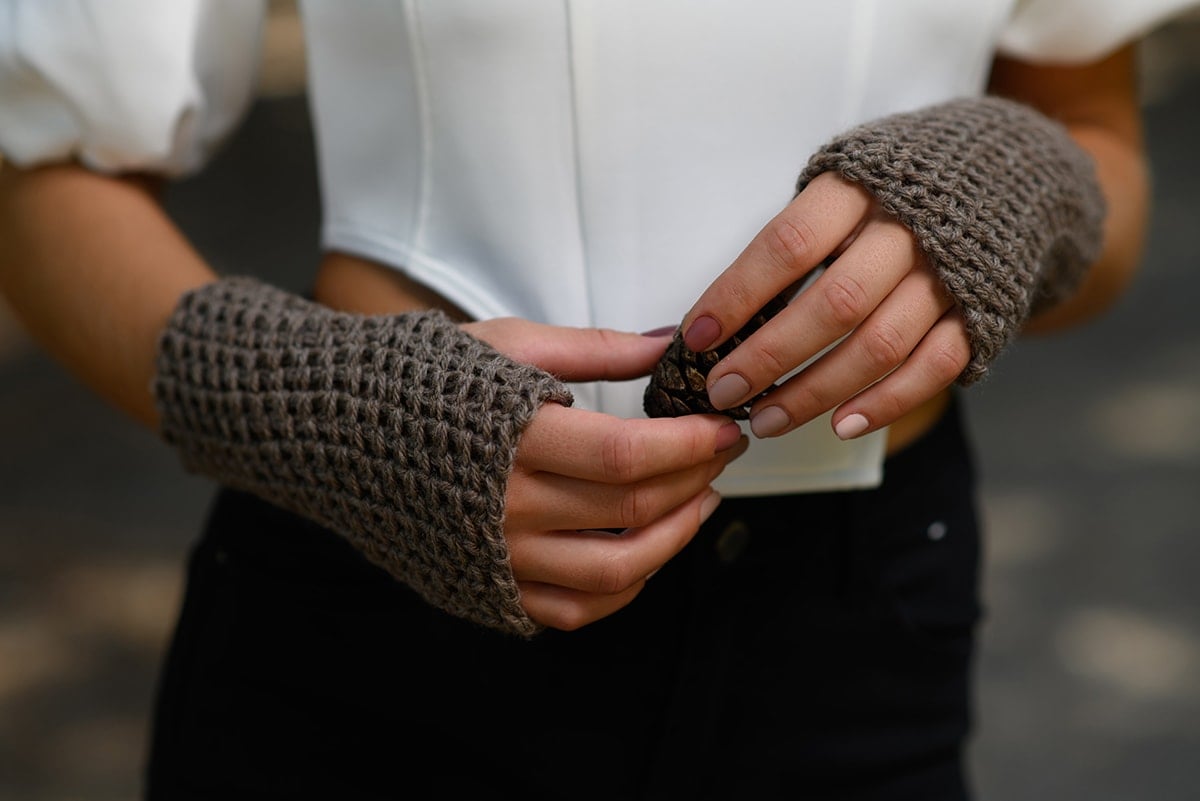
THIS ARTICLE CONTAINS AFFILIATE LINKS THAT SUPPORT HANDY LITTLE ME CONTENT AND FREE PATTERNS.This Carolina crochet fingerless gloves pattern will allow you to practice crocheting a simple stitch pattern using only single crochet.
I wanted to share a crochet gloves pattern inspired by the TV show Outlander.
This design uses basic crochet stitches to create a pair of fingerless gloves that will make a great gift.
Please scroll down to view the free crochet pattern or grab your printer-friendly, ad-free PDF from my shop here.

Inspired by The Outlander Knits
This design is inspired by the knitted arm warmers that Claire wears with her Carolina shawl in Outlander season 4.
Claire is seen wearing them as hand and wrist warmers, but in my design, I left a gap for the thumb so they can be worn either way.
They can be made in any color and are really practical for wearing during the colder months.

Create Your Own Fingerless Gloves With This Easy Crochet Pattern
Crocheting fingerless gloves is a great way to create stylish and functional accessories that are perfect for cooler months.
This easy crochet pattern for the Carolina Fingerless Gloves is ideal for anyone, whether you’re an absolute beginner or a more experienced crocheter looking for a fun project.
The very simple design makes it an easy fingerless gloves pattern to follow, using simple stitches and a manageable number of chains.
These fingerless crochet gloves allow for the use of your fingers while keeping your hands warm, making them a great option for both everyday wear and warmer climates.
The Perfect Gift And A Great Project For Cooler Months
This particular pattern offers instructions for different sizes so that you can customize your own fingerless mittens or fingerless mitts with ease.
Be sure to work a gauge swatch before starting to ensure the perfect fit. The crochet stitch texture adds a touch of elegance, and these hand warmers make a great addition to your accessory collection.
They’re also a perfect gift for friends and family during the cooler months.
Whether you’re looking for a great project to try or want to create your own fingerless gloves, this pattern is an excellent choice for anyone who loves easy crochet projects.
View the knitted version of these mittens here – Outlander Claire Carolina Fingerless Gloves Pattern.

More Outlander Patterns
This pattern is part of my Outlander crochet collection; you can see the other Outlander crochet patterns here or take a look at the patterns below;
- Crochet Claire’s Rent Shawl From Outlander
- Claire’s Tassel Shawl Crochet Pattern
- Outlander Cowl Crochet Pattern
- Outlander Shawl Crochet Pattern {Claire’s Carolina}
- Fraser’s Ridge Mittens Crochet Pattern
- Claire Outlander Shawl Crochet Pattern {Fraser’s Ridge}
- Healing Hands Mitts (Chevron Crochet Pattern)

Resources and tutorials you may find helpful in following this pattern:
This fingerless gloves crochet pattern is great for any beginner.
- You should be comfortable making a slipknot (how to make a slip knot (step by step)) and creating a chain (how to start a crochet chain).
- How to single crochet (SC).
- You should also be comfortable reading crochet patterns (how to read crochet patterns for beginners).
- And understanding crochet abbreviations and terms (US + UK).

Carolina Crochet Fingerless Gloves Pattern
Grab your ad-free, printable PDF pattern HERE.
Access ALL of the Outlander Crochet Patterns here.
Notes
Skill Level – Basic (For beginner crocheters)
The fingerless gloves are crocheted using a simple textured crochet stitch, the linen stitch.
This gives them lots of texture and helps to make them look similar to the knitted version.
This is a great beginner stitch pattern as it’s simple to learn and has great results!
Related post with video tutorial: How To Crochet The Linen Stitch
Copyright Info
- Please do not copy, sell, redistribute, or republish this pattern.
- If you wish to share this pattern, please provide a link to the pattern page only.
- You may sell items produced using this pattern.
- Do NOT use the copyrighted photos for your product listing.
- For the copyright T&C, please read my Terms of Use.
Size Information
Gauge – 8 sts / 16 rows in 10x10cm/4×4 inches. (In pattern)
Measurement/Size Info
- The mitts in the photographs are small size.
- Length (laying flat and not stretched out before seaming) = 7.5 inches/20cm
- Width (laying flat and not stretched out) = 6 inches/16cm
- The size of the mitts can easily be adjusted to fit any hand/wrist size.
- You can easily adjust the size of the mitts (to make them smaller or larger) by working fewer or more rows than given in the pattern.
- You will ch 34 sts to have the same length – 7.5 inches, you can chain fewer or more to make the mitts shorter or longer in multiples of 2.
- You will adjust the width by working fewer or more rows in the pattern.

The Supplies You Need
Yarn
- Cascade 220 Yarn.
- 1 skein x Cascade 220 – color 8013 Walnut Heather.
- 100g/219 yds/200m.
- Any Aran/Worsted weight yarn/10-ply yarn will be suitable for this project.
Hook
Notions
- Tape measure
- Yarn needle
- Scissors

Abbreviations
This crochet wrist warmers pattern is written in US crochet terms.
You can get a free PDF download of all US and UK crochet terms and abbreviations here – Crochet Abbreviations And Terms (US + UK)
- CH – Chain
- Cont – Continue
- Patt – Pattern
- Rep – Repeat
- RS – Right side
- SC – Single crochet
- Sp – Space
- Sl St – Slip stitch
- St(s) – Stitch(es)
- WS – Wrong side

Crochet Gloves Pattern
Notes
You will make two pieces for the mittens.
Each piece is worked sideways in length.
Each piece is worked with a single strand of yarn.
Pattern Instructions
- (CH multiples of 2) Make a slipknot and CH 34, turn,
- Row 1: (RS) CH 1, 1 SC in the 2nd CH from the hook, *CH 1, skip the next CH, 1 SC in the next CH, rep from * to end, turn,
- Row 2: (WS) CH 1, skip the first SC, * SC in the next SC 1-SP, CH 1, skip the next SC, rep from * to the end of the row. SC in the last st, turn,
*Rep row 2 until the piece measures = 6 inches.
To finish the final stitch, Sl-St and then cut a length of yarn for seaming – around 12/14 inches long.
*This is where you can adjust the width of the mitts – if you need to make them larger to fit around your hand, you can easily add more rows until you have your desired length for a comfortable fit.
TIP – Test by placing around your hand/wrist to see if you need to add more rows as you work.
Making Up
- Fold the piece in half and start seaming from the bottom edge up for around 5 inches, using the mattress stitch (or you can sc the sides).
- Leave a thumb hole for your thumb to fit through that measures around 1.5 inches.
- Then, continue to seam the top of the hand for 1.5 inches.
- Weave in all loose ends.
- Repeat with the second mitt.
*If you make changes to the length, you will have to adjust the measurements for seaming.
Related Post: Mattress Stitch – How To Seam Knitting

Could you share your work with us?
I love seeing your finished projects on social media.
If you enjoyed making the free pattern, I’d love to see yours on Instagram, be sure to tag me @handylittleme or #handylittleme to be featured.
If you are on Facebook, stop over to the handylittleme Facebook group and share a photo.
I’d love to see your work!
Outlander Knitting Patterns
If you also love knitting, check out these free Outlander knitting patterns.
- Outlander Carolina Shawl Pattern
- Claire’s Rent Shawl Knitting Pattern
- Outlander Cowl Knitting Pattern (Claire Season 1)
- Journeycake Sontag Shawl Knitting Pattern
- Jenny’s Shawl Knitting Pattern (Outlander Knit)
- Outlander Brianna Fingerless Gloves Pattern
- Outlander Claire’s Cable Knit Wrist Warmers
- Beret Knitting Pattern (Beginner Friendly!)


