Knitted Christmas Tree Ornament (Free + Easy Pattern)
THIS ARTICLE CONTAINS AFFILIATE LINKS THAT SUPPORT HANDY LITTLE ME CONTENT AND FREE PATTERNS.In this post, you will see a knitted Christmas tree ornament pattern.
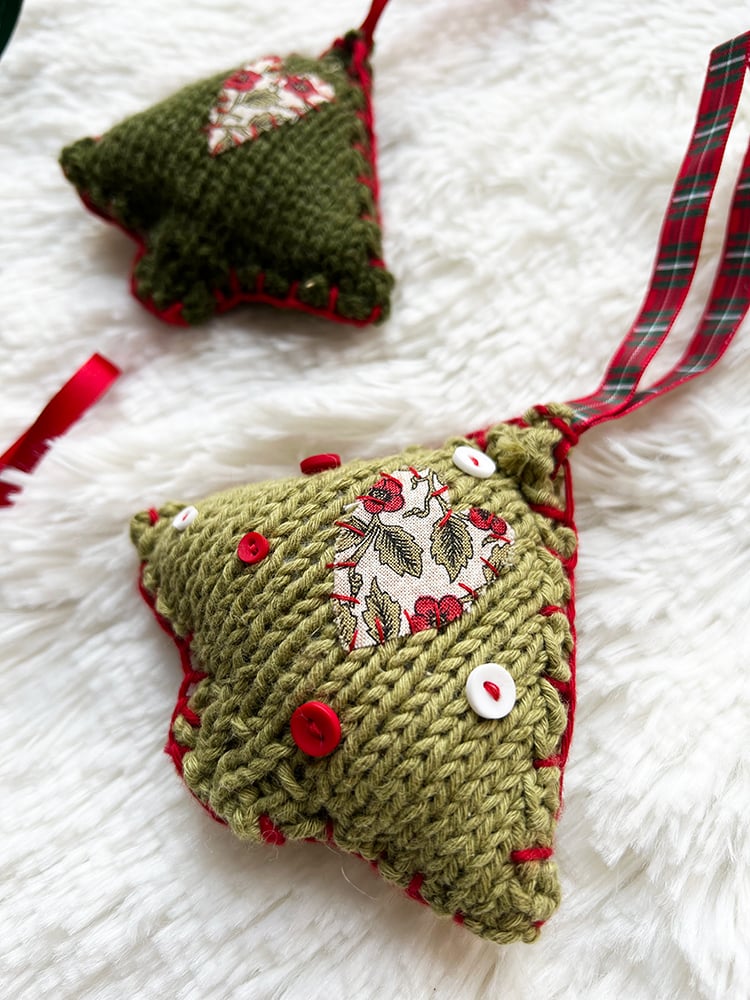
If you are looking for your next holiday craft project, the little knit Christmas trees will look incredible on your tree and give your Christmas decor a handmade vibe.
Made simple in two pieces and then stuffed, the trees can have decorative buttons, beads, or appliqued hearts stitched onto them.
Make a bunch and decorate your home with them for a festive treat, or use them as gift tags or gift toppers.
Scroll down to view the free pattern, or grab the ad-free PDF from my shop here.

Your Next Craft Project For The Christmas Season
Make the little Christmas trees in your favorite colors, using leftover yarns from your stash (you don’t need a full ball of yarn for this project).
This is an easy little tree to make for those of you who are at the beginner or advanced beginner level, and the techniques you will need to know are knit, purl, and k2tog.
Using mainly knit and purl stitches, you will shape the tree through a series of increases and decreases.
You can make them in different sizes using larger or smaller knitting needles and different yarn weights.

Resources and tutorials you may find helpful in following this pattern:
This Christmas tree knitting pattern is great for any advanced beginner knitters.
- Knitting cast-on methods
- Knitting Lessons
- How to cast on knitting
- How to cast off knitting for total beginners (step by step)
- How to knit garter stitch
- How to knit the purl stitch (for beginners + a video tutorial)
- How to knit stockinette stitch (for beginners)
- How to read knitting patterns for beginners
- Knitting abbreviations and terms (US and UK)
- How to knit rib stitch patterns (1×1 and 2×2 ribbing)

Christmas Tree Pattern
Notes
You can grab the ad-free printable PDF pattern in my shop here.
Skill Level – Easy
This free knitting pattern is for Christmas ornaments for the holiday season.
There are detailed instructions for this simple knit below.
You can use any DK yarn in your stash (scrap yarn), from wool fibers to acrylic DK yarn.
Using your yarn scraps is the perfect way to make some handmade festive decorations.
For more great stashbusters look here – 20 Patterns To Use Up Your Yarn Stash
Size – Height = 3.5 inches/Width = 4 inches at the widest point.
Gauge – 8 sts in 2 inches.
Copyright Info
- Please do not copy, sell, redistribute, or republish this pattern.
- If you wish to share this pattern, link to the pattern page only.
- You may sell items produced using this pattern.
- Do NOT use copyrighted photos for your product listing.
- For the copyright T&C, please read my Terms of Use.

The Supplies You Need
Yarn
- Scraps of DK yarn/lightweight yarn 03 yarn – in Green
- Yarn Weight Guide (+ Conversion Chart)
Needles
- 4 mm needles (US 6) Knitting needles
- You can use straight needles for this project.
Notions
- Tape measure
- Darning needle or tapestry needle
- Scissors
Other Materials
- Toy stuffing/fiberfill
- Buttons – red/white
- Fabric – for heart decoration
- Embroidery thread – red
- String or ribbon to hang

Abbreviations / Knitting Abbreviations And Terms (US And UK) List
- Approx = Approximately
- Beg = Begin(ning)
- Cont = Continue(ing)
- K = Knit
- K2tog = Knit the next 2 stitches together
- P = Purl
- M1 = Make 1 stitch
- Rem = Remaining
- Rep = Repeat
- St(s) = Stitch(es)
Pattern Instructions
Make 2 pieces:
- Cast on 4 sts.
- Purl one row.
- Knit one row.
- Continue until the piece measures 1 inch.
- With right side facing cast on 6 sts.
- Knit.
- With the wrong side facing cast on 6 sts.
- Purl.
- Knit.
- Purl.
- K2Tog knit till last 2 sts K2tog.
- Purl.
- Knit.
- Purl.
- K2Tog knit till last 2 sts K2tog.
- Purl.
- K2Tog knit till last 2 sts K2tog.
- Purl.
- K2Tog knit till last 2 sts K2tog.
- Purl.
- K2Tog knit till last 2 sts K2tog.
- Purl.
- K2Tog knit till last 2 sts K2tog.
- Purl.
- K2Tog, K2tog.
- Purl.
- Cast off 2 and leave a long tail of yarn for seaming.

Making Up
- When you have both tree pieces, you can decorate how you want by adding buttons or stitching a fabric heart.
- Place the right sides on the outside, pin in place if you wish, and stitch with a decorative blanket stitch around the edges.
- Leaving a gap to stuff, place the hanging ribbon/hanging loop or string at the top of the tree and secure it when you sew.
- Stuff the tree decoration and stitch to close the gap.
- Your decorations should now be ready to hang on the Christmas tree!

Free Knitting Patterns For Christmas
- Knit Tree Skirt Pattern (Free And Easy Christmas DIY)
- 28 Free Christmas Stocking Knitting Patterns (The Best)
- 30+ Free Christmas Knitting Patterns (Best Knitted Ideas)
- 30 Christmas Sweater Knitting Patterns (Jumper Ideas)
- 17 One Skein Knitting Patterns {Easy + Quick}
- 35 Free Knitted Christmas Decorations (Knitting Patterns)
- 27 Free Christmas Knitting Patterns For Babies
- 33 Free Christmas Knitting Patterns For Kids
- 13 Vintage Knitted Christmas Stocking Patterns
- Tartan Christmas Decorations (Plaid Knitting Pattern)
- The 50+ Best Free Knitted Gifts For Christmas
- Christmas Blanket Knitting Pattern (Free + Festive!)
- How To Make A Chunky Knit Pillow Cover- Free Pattern
- How To Make An Easy Pom Pom Christmas Tree DIY Craft
- How To Make A Christmas Wreath (Easy Homemade DIY)
- Christmas Tree Hat Knitting Pattern
- Dog Santa Outfit Costume DIY (Free Knitting Pattern)
- 47 Holiday Knitting and Crochet Patterns
- 44 Handmade Gifts – The Best Ideas For Everyone On Your List
- Dog Christmas Hat Pattern
- Knitted Elf Hat Pattern
- Knitted Santa Hat
- Holly Jolly Dishcloth Knitting Pattern (Free Printable)
- Candy Cane C2C Dishcloth (Free Printable Knitting Pattern)
- 17+ Nordic Knits For Christmas – Free Patterns
- 25 Free Knitted Christmas Baubles And Ornaments
- 15+ Free Knitted Advent Calendar Patterns
- Knitted Christmas Bauble Cover (Free Printable)
- 10 Free Christmas Tree Skirt Knitting Patterns
- Free Chunky Christmas Tree Skirt Knitting Pattern (Large Yarn)
Share your work with us…
I love seeing your finished projects on social media.
If you enjoyed making the mini Christmas tree, I’d love to see yours on Instagram, be sure to tag me @handylittleme.
I’d love to see your work.
Happy Holiday Knitting!
Love your sight! So many great ideas and things to accomplish!
Keeps me busy and I enjoy the projects so much! With 14 grand children, and 16 greats, love doing small easy crafts!
Look forward to them.
Hi Mary,
Thank you so much for your lovely comment—it truly made my day! I’m so happy to hear you’re enjoying the projects.
With 14 grandchildren and 16 great-grandchildren, I can only imagine how much joy (and crafting!) must fill your days.
Small, easy crafts are perfect for making thoughtful, handmade gifts—and I’m so glad the site is helping to keep you inspired and busy.
Looking forward to sharing more fun ideas with you soon!
Warmest wishes,
Louise