Knitted Lovey Pattern – Free Baby Comforter
THIS ARTICLE CONTAINS AFFILIATE LINKS THAT SUPPORT HANDY LITTLE ME CONTENT AND FREE PATTERNS.In this blog post, you will see a Knitted Lovey Pattern – Free Baby Comforter.
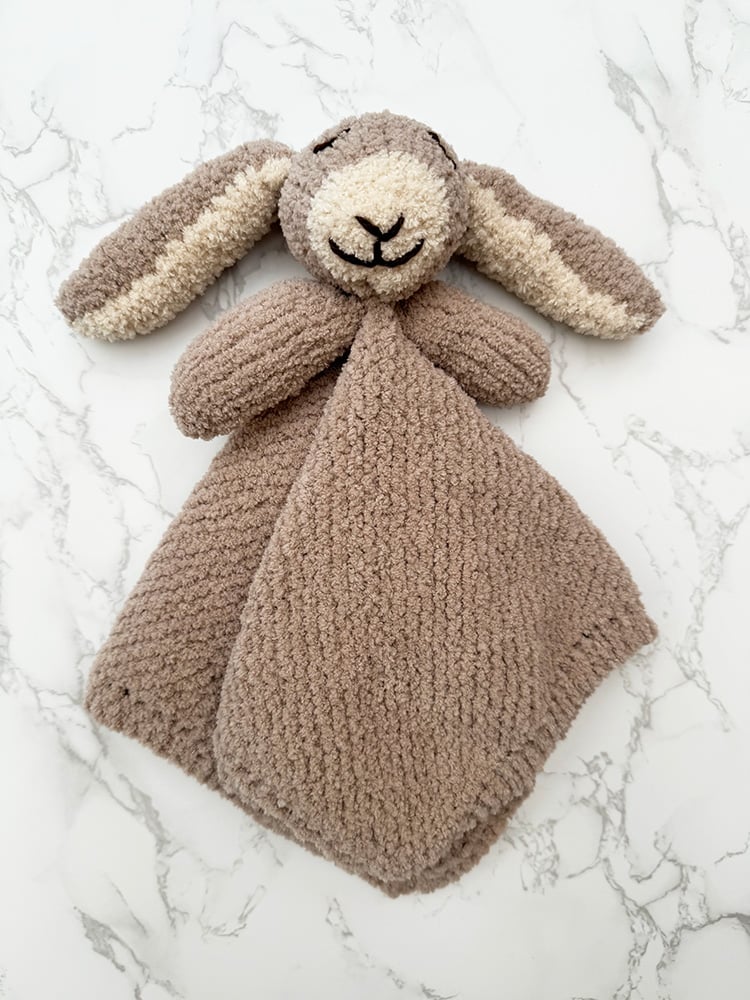
This soft and floppy-eared bunny lovey will quickly become your baby’s favorite comfort companion.
Easy to knit and adorable to look at, it’s a perfect beginner-friendly project that adds a handmade touch to any baby shower gift.
The full pattern is free below, or you can purchase the ad-free printable PDF here.

Bunny Lovie Details + Tips for Beginner Knitters
This sweet bunny doll lovie was inspired by the idea of creating something soft, safe, and full of character, a cuddly mini friend your baby will adore.
Whether you’re knitting for a little one’s first name monogrammed gift or just looking for some soft toy inspiration, this project has all the charm!
To get started, take a moment to knit a gauge swatch to check your tension.
This ensures your finished lovey blanket comes out the right size.
The main square blanket features a subtle texture.
The bunny’s head fits snugly in your hand (approximately 6–8 cm diameter) and makes the perfect match for the body.
It’s just the right size for cuddles, travel, or naps.
Moreover, this project is ideal for beginner knitters, especially those exploring small-scale, meaningful makes like the Yummy Friends collection or other toy-themed knits.
Notes:
- Always ensure toys like loveys are only introduced to babies over 12 months old for safe sleep.
- The lovey blanket is knit flat (not in the round) on straight needles.
- The bunny head, ears, and arms are knit separately and sewn on.
- The design is beginner-friendly and great for stash-busting leftover yarns.
Copyright Info
- Please do not copy, sell, redistribute, or republish this pattern.
- If you wish to share this pattern, please provide a link to the pattern page only.
- You may sell items produced using this knitted lovey pattern.
- Do NOT use copyrighted photos for your product listing.

The Supplies You Need
Yarn
- Yarn A/MC = 2 x Alize Baby Softy (50g/115m/126 yards) in brown or grey yarn.
- Total yards needed = 252 yds.
- Yarn B/CC = A contrasting color for the underside of the ears and nose (roughly around 10g/20 yards) in cream or white yarn.
- A small amount of yarn in a darker color for the eyes, nose, and mouth.
- Yarn weight used – DK/Light Worsted/8-Ply.
- You could use worsted-weight yarn instead with the correct needle size.
Yarn Substitutes
Needles
Notions
- Scissors
- Tapestry needle/yarn needle
- Tape Measure
Other Materials
A small amount of fiberfill/toy stuffing for the head and arms.
Size Information
- Finished size of the lovey blanket = 12 inches x 12 inches.
- The total length of the bunny lovey (including head) = 14 inches.
- Gauge – 15 sts and 32 rows in 4×4 inches/10 x 10 cm.

Knitting Abbreviations
- Approx – Approximately
- Beg – Begin(ning)
- CO – Cast on (long tail)
- CC – Contrasting color
- Cont – Continue
- Dec – Decrease
- Inc – Increase
- K – Knit
- KFB – Knit into the front and back of the stitch (to increase)
- K2tog – Knit the next two stitches together
- MC – Main color
- M1 – Make one st
- M1p – M1p (make one stitch purl – to increase on a purl row)
- P – Purl
- Rem – Remaining
- Rep – Repeat
- St(s) – Stitch(es)
- St St – stocking stitch – knit 1 row, purl 1 row
- YO – Yarn over
Print + Stitch
Purchase the ad-free PDF pattern
Want a clean, printable version of this pattern? You can purchase the ad-free PDF in my shop. It’s perfect for printing, saving to your device, and making without distractions.
Knitted Lovey Pattern Instructions
- Yarn A – MC (Brown or grey)
- Yarn B – CC (cream or white)
Lovey Blanket Pattern
With Yarn A – CO 5 sts
- Row 1: Knit
- Row 2: Knit 3, YO, Knit 2 – (6 sts)
- Row 3: Knit 3, YO, Knit 3 – (7 sts)
- Row 4: Knit 3, YO, Knit to the end of the row.
Rep row 4 until the piece measures 12 inches.
Decrease
To decrease the blanket, you need to work the following rows:
- Row 1: K2, K2tog, YO, K2tog, Knit to the end of the row.
- Rep row 1, keeping the color pattern as established until 7 sts remain on the needle.
- K2tog, K2tog, K2tog, K1.
- Cast off
- Weave in all loose ends.
The lovey blanket should measure 12 x 12 inches.

Bunny Arms – Make 2
- With Yarn A – Cast on 6 sts.
- Row 1 – Purl 1 row.
- Row 2 – K1, M1 – rep to the end of row. (11 sts)
- Row 3 – Purl 1 row.
- Row 4 – K1, M1, K4, M1, K1, M1, K4, M1, K1. (15 sts)
- Rows 5 – 11 – Work 7 rows in st st (Starting with a P row and ending on a P row).
- Row 12 – K1, K2tog, K2, K2tog, K1, K2tog, K2, K2tog, K1. (11 sts)
- Rows 13 – 15 – Work 3 rows, inc (m1p) 1 st at each end of the next row. (13 sts) (Starting with a P row and ending on a P row)
- Rows 16 – 25 – Work 10 rows in st st – ending on a P row.
- Row 26 – K1, K2tog, K1, K2tog, K1, K2tog, K1, K2tog, K1. (9 sts)
- Row 27 – Purl 1 row.
- Row 28 – K1, K2tog – rep to end of row. (6 sts)
- Cut a length of yarn around 8″ and thread it through the remaining stitches, stitch the arm seam, and leave an opening at the top of the arm for stuffing.
- Stuff the arm with polyfill stuffing and stitch closed.
- Weave in any loose ends.

Bunny Head – Make 1
- With Yarn A – Cast on 7 sts.
- Row 1 – Purl 1 row.
- Row 2 – K1, M1 – rep to the end of the row. (13 sts)
- Rows 3 – 4 – Rep the last two rows once more. (25 sts)
- Rows 5 – 7 – Work 3 rows in st st. (Starting with a P row and ending on a P row)
- Row 8 – *K1, M1, K3* Rep from * to * till the end of the row. (31 sts)
- Rows 9 – 21 – Work 13 rows in st st. (Starting with a P row and ending on a P row)
- Row 22 – (Change to Yarn B/CC) K1, K2tog – rep to the end of the row. (21 sts)
- Rows 23 – 27 – Work 5 rows in st st. (Starting with a P row and ending on a P row)
- Row 28 – K1, K2tog, rep to the end of the row. (14 sts)
- Row 29 – Purl 1 row.
Bunny Head – Making up
- Cut a length of yarn around 8″ and thread it through the remaining stitches. Stitch the head seam to the end of the nose.
- Next, you need to seam from both ends and leave a small gap in the middle to stuff the head.
- The nose is the pointy end, and the back of the head is the more rounded, curved end.
- Tip – I would seam the nose first, then add the facial features – eyes/mouth and nose in a darker colored yarn.
- After that, seam from the back, leaving a hole in the middle to stuff.
- Once stuffed – seam that hole closed.
- Once the head is stitched onto the lovey blanket, you won’t be able to see that hole seam on the head at all.
- Weave in the loose ends.
Bunny Ears – Make 2
- With Yarn A/MC – (Starting at the top of the ear/Outer Ears) Cast on 8 sts.
- Rows 1 – 38 – K 38 rows.
- Row 39 – K2tog, K to last 2 sts, K2tog. (6 sts)
- Row 40 – K row.
- Row 41 – K2tog, K to last 2 sts, K2tog. (4 sts)
- Row 42 – K row.
- Row 43 – K2tog, K2tog. (2 sts)
- Row 44 – (underside of ears/inner ear) – Change to yarn B/CC and K row.
- Row 45 – KFB, KFB. (4 sts)
- Row 46 – K row.
- Row 47 – KFB, K to last st and KFB. (6 sts)
- Row 48 – K row.
- Row 49 – KFB, K to last st and KFB. (8 sts)
- Row 50 – K row.
- Row 51 – K row.
- Rows 52 – 87 – Continue to work in garter stitch (knit every row) for another 35 rows.
- Cast off.
- Cut a long length of yarn and start to stitch the ear seams together (using an invisible seam).
- Once the seam is done, they will be ready to attach to the head.
- Weave in any loose ends.
Lovey Blanket and Bunny Finishing/Making Up
- First, the ears – Seam the ears by folding them in half with the right sides facing out, then sew them using the mattress stitch.
- Next, stitch one ear to one side of the head. (Use the photographs as a guide to help you if needed.) Then, repeat the process with the other ear. They should be stitched securely into place.
- Now, sew the head to the blanket – Pick the blanket up by the central point so the corners are equal on all sides.
- To attach the head, thread the yarn tail from the head through the blanket a few times so the head is secure. (Again, use the photographs as a visual reference if needed.)
- Moving on to the arms – Stuff the arms and seam the openings closed, leaving a yarn tail.
- Then, using the yarn tail, thread the yarn needle and push it through the blanket just underneath the head, as well as through the other arm on the opposite side.
- Continue by going back and forth a few times to secure the arms in place. (Refer to the photos to help position the arms if needed.)
- Finally, weave in any loose ends and test the strength of the head and arms to ensure they are firmly attached.
- If necessary, sew again to reinforce any areas that feel loose and make sure everything stays securely in place.

Share Your Make
I love seeing your finished projects on social media.
If you enjoyed making the lovey knitting pattern, I’d love to see yours on Instagram, tag me @handylittleme.
Additionally, if you are on Facebook, feel free to stop over to the Handylittleme Facebook group and share a photo with the community.
You can also connect with us on Ravelry, Pinterest, Etsy, and YouTube for more knitting inspiration and patterns.
I’d love to see your work.
Happy Knitting!

Bunny Lovey FAQ
Why Knit A Bunny Lovey?
Knitting for babies is a heartwarming and meaningful experience.
Whether you’re a beginner or a seasoned knitter, this knit lovey pattern makes for an adorable and quick project.
- Uses basic stitches with some shaping for the head.
- Easy to customize with different yarn colors.
- Makes a thoughtful baby shower or first birthday gift.
- Doubles as a cozy companion and a keepsake your child can treasure.
From bedtime snuggles to car seat rides, this bunny comforter is a cozy companion that can go everywhere with your little one.

What Yarn Is Best For A Baby Lovey?
Choosing the right yarn is key to making a lovey that’s safe, soft, and long-lasting.
Considerations for Bunny Lovey Yarn:
- Softness – Opt for baby-safe yarns like organic cotton, bamboo, or soft acrylic.
- Durability – Choose machine-washable yarns to withstand everyday use.
- Hypoallergenic – Ideal for babies with sensitive skin; natural fibers like cotton are great.
- Safety – Avoid detachable embellishments. Embroider eyes or use securely stitched features.
- Color & Weight – Bright colors are stimulating for babies, while DK or worsted weight yarns offer softness and structure.
Learn more here: Yarn Weight Guide {+ Conversion Chart}
Read this guide: Yarn Types Explained: A Guide To Different Fibers

What Is A Lovey Blanket?
A lovey is a small, cuddly blanket or soft toy designed to bring comfort and security to babies and toddlers.
Key Features:
- Size – Typically 12–18 inches square, perfect for little hands.
- Texture – Soft and soothing against baby’s skin.
- Purpose – Helps with self-soothing and provides a sense of security.
- Design – Often includes a soft toy or animal head like this bunny.
Parents often introduce a lovey when a child starts to self-soothe, and they can become cherished companions for years.
If you would like to make more knitted items for the baby, please take a look at the other patterns in the baby knitting pattern library – Baby Knitting Patterns.

At what age can a Baby Sleep with a Lovey?
The American Academy of Pediatrics (AAP) recommends avoiding all soft objects, including loveys, in a baby’s crib until they are at least 12 months old.
Safety Guidelines:
- Under 12 Months – Avoid using loveys during sleep to reduce SIDS risk.
- After 12 Months – A small, soft lovey can be introduced safely.
- Ongoing Safety – Always choose breathable materials, avoid small parts, and follow sleep safety practices.
Consult your pediatrician to determine the best time for your child to start using a lovey.
More Free Patterns
Check out more knitting patterns for baby/kids’ accessories and garments.
- Baby Bunny Hat (Easy + Quick Pattern)
- Easter Bunny Pattern (Floppy Ears + Cuddly!)
- Bunny Softie Pattern (Easy To Knit)
- Easter Bunny Egg Cozy
- Bunny Slippers For Baby (Perfect For Easter!)
- Easter Bunny Hat {Knit Flat}
- Bunny Ears Headband {With Knitted Ears}
- 10 Easy Easter Knitting Patterns
- Knitted Bunny Patterns {Perfect Easter Gifts}
- Easter Chick Slippers Pattern {+ Loop Stitch Tutorial}
- Bunny Tea Cosy Pattern
- Bunny Ear Hat (Easy Pattern)
- Stuffed Bunny Pattern {With Crochet Overalls}
- Bunny Booties Knitting Pattern
- Sheep Baby Booties Knitting Pattern
Free Crochet Patterns
And if you love crocheting, check out these free patterns.
- Crochet Heart Pattern {Easy Amigurumi}
- Crochet Cup Cozy Pattern
- Crochet Easter Basket (Free Pattern PDF)
- Crochet Easter Eggs {Free Pattern Download}
Plus, check out the crochet lessons – Crochet Lessons {With Video Tutorials}.
Knitting Lessons
If you are a new knitter and need help with the knitting basics, check out the knitting lessons here – Knitting Lessons (With Video Tutorials).
For a complete guide on learning how to knit, check out this post: How to Knit – A Complete Beginner’s Guide
And if you need more video tutorials, check out my YouTube channel here – Handy Little Me – YouTube.
Hi,
What colour do I start to knit the head with please. The pattern says yarn A, but this is not identified on the pattern. I’m thinking that it’s probably the cream? And when is the second colour introduced? Thanks 🙂
Hello Maree,
Sorry about that, I have now edited the pattern to include all color changes where they should be.
Thanks for letting me know.
Louise
Hi Louise! I really enjoyed making this baby lovey. What a very cute creation. Thank you for sharing your pattern.
Thank you Vanessa, I’m so happy you enjoyed the pattern 😉