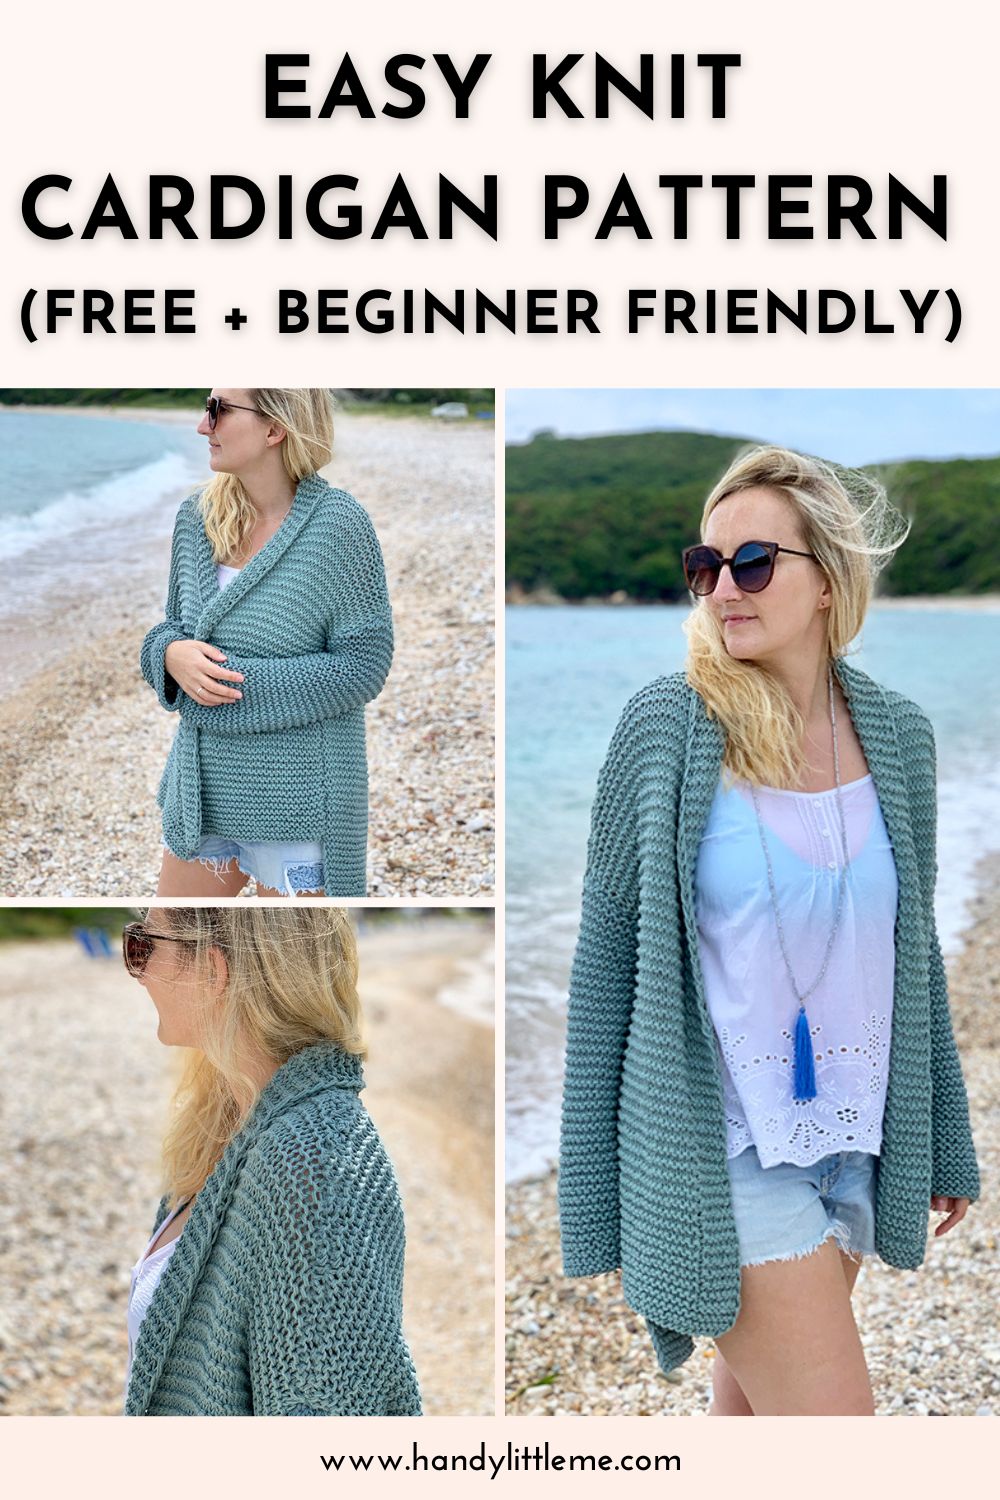
Easy Knit Cardigan Pattern (Free + Beginner Friendly) – Cotton Comfort
THIS ARTICLE CONTAINS AFFILIATE LINKS THAT SUPPORT HANDY LITTLE ME CONTENT AND FREE PATTERNS.Looking for a cozy, oversized cardigan that’s simple to make and perfect for layering?
This easy knit cardigan pattern is ideal for beginners ready to knit their first garment, or for experienced knitters wanting a relaxing, rewarding project.
Knit in soft cotton with simple stitches, it’s lightweight enough for spring and summer evenings but cozy enough for cooler days.
Best of all? This is a free cardigan knitting pattern you can make in just a few weeks.
Scroll down to view the free pattern or grab your printer-friendly, ad-free PDF here.
Why This Is The Perfect Easy Cardigan Knitting Pattern
- Beginner-friendly stitches – Mostly knit and purl, with very simple shaping.
- Quick to knit – Uses 8mm (US 11) needles and two strands of yarn held together for a fast finish.
- Versatile fit – Loose and cozy with minimal shaping, so you don’t have to worry about perfect tailoring.
- Season-spanning – Works as a summer beach layer or a winter lounge cardigan.
- Customizable length – Add or remove rows for a cropped or longer style.
This is a great “first garment” project if you’ve only knit accessories before.
The oversized style means it’s forgiving, and the construction is straightforward, so you can focus on building confidence.

The Cotton Comfort Cardigan Pattern
Grab your inexpensive, ad-free, PDF printable pattern in my shop here.
Notes
There are 5 sizes available – small, medium, large, XL, and XXL.
In the photographs, I am wearing the medium size for a UK size 10/12/US size 6/8.
Please read the notes section of the pattern below before starting to knit.
The pattern is written for all sizes, starting with the small size, with changes for different sizes listed in all necessary places (the parentheses).
Copyright Info
- Please do not copy, sell, redistribute, or republish this pattern.
- If you wish to share this pattern, link to the pattern page only.
- You may sell items produced using this pattern.
- Do NOT use the copyrighted photos for your product listing.
- For the copyright T&C, please read my Terms of Use.
Further Notes
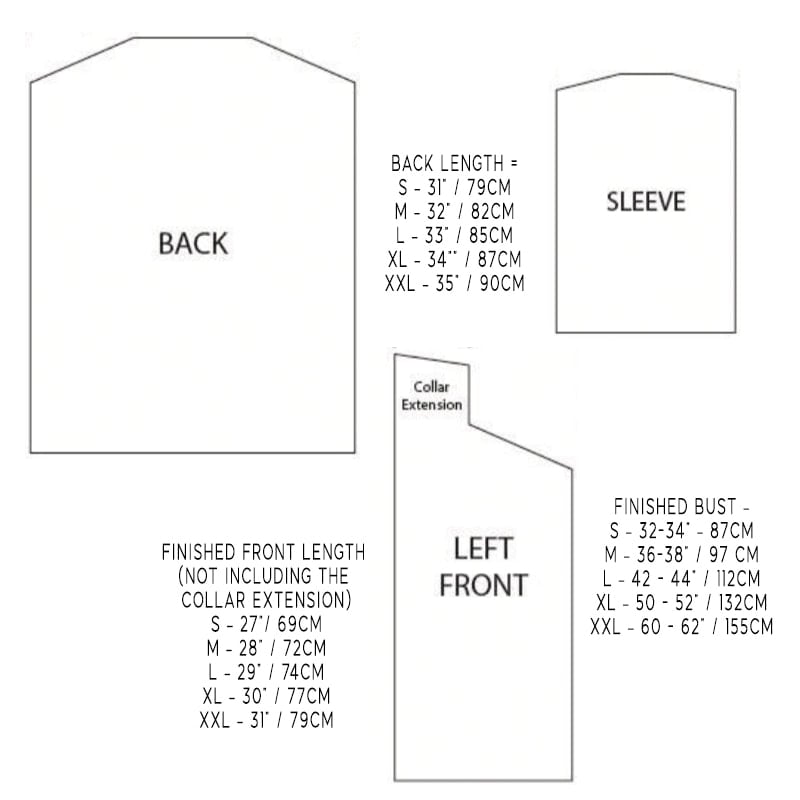
- The cardigan is made from 5 pieces – back, 2 fronts, and 2 sleeves.
- Circular needles are used because there are many stitches, work back and forth on those needles, and do not join in the round for any piece.
- The front panels and back panel are worked bottom-up.
- Each row of each piece begins with a slip stitch and ends with a purl stitch for any selvedge.
- Selvedge stitches create a neat edge for seaming.
- You can slip as if to knit or to purl, whichever you prefer.
- The back piece is about 5 inches (13cm) longer than the front pieces.
Skill Level – Easy
Gauge – 10 x 10 cm /4 x 4 inches = 10 sts and 16 rows in garter stitch.
The Supplies You Need
Recommended Yarn
- Rico Creative Cotton Aran in Patina – 50g / (85m/93 yards).
- This is an Aran/Worsted weight yarn/10 Ply yarn – knit with two strands together.
- If you want to knit with a single strand only, you will need Bulky/Chunky/12 Ply yarn.
- For the following sizes, you will need;
- Small – 14 – 50g (700g/1,190m/1,303yds)
- Medium – 16 – 50 g (800g/1,360m/1,488yds)
- Large – 20 – 50g (1000g/1,700m/1,860yds)
- XL – 24 – 50g (1200g,2,040m/2,232yds)
- XXL – 28 – 50g (1400g/2,380m/2,604yds)
- Yarn Weight Guide (+ Conversion Chart)
Needles
- 8 mm (US 11) knitting needles – if using circular knitting needles – with a 40cm cable
Notions
- Tape measure
- Darning needle
- Scissors
- Stitch markers
Measurements/Sizes
Sizes – S / M / L / XL / XXL
Finished Bust
S – 32-34” – 87cm
M – 36-38” / 97 cm
L – 42 – 44” / 112cm
XL – 50 – 52” / 132cm
XXL – 60 – 62” / 155cm
Finished Back Length
S – 31” / 79cm
M – 32” / 82cm
L – 33” / 85cm
XL – 34”” / 87cm
XXL – 35” / 90cm
Finished Front Length (not including the collar extension)
S – 27”/ 69cm
M – 28” / 72cm
L – 29” / 74cm
XL – 30” / 77cm
XXL – 31” / 79cm
Abbreviations
Knitting Abbreviations And Terms (US And UK)
- Beg – beginning
- K – knit
- K2tog – knit two stitches together
- P – purl
- PM – place marker
- Rem – remaining
- Rep – repeat
- RS – right side
- Sl – slip
- St(s) – stitch (es)
- WS – wrong side
Pattern Instructions
Back Piece
- Cast on – 57 (75, 93, 111, 129) sts
- Row 1 – Sl 1 (selvedge), K to last st, p1 (selvedge).
- Rep row one until the back piece measures – from the beginning: 23”/59cm ( 24”/61cm, 25”/64cm, 26”/67cm, 27”/69cm)
- End with a WS row as the last row you work.
Shape the shoulders
- Cast off 1 (2, 3, 4, 5) sts at the beg of the next 8 (10, 12, 14, 16) rows. 49 (55, 57, 55, 49) sts.
- Cast off 2 sts (S/M) 3 sts (L/XL/XXL) at the beg of the next 12 (10, 8, 6, 4) rows. 25 (35, 33, 37, 37) sts.
- Cast off.

Left Front
- Cast on 33 (39, 51, 57, 69) sts.
- Row 1: Sl 1, P6, PM, K to last st, p1.
- Row 2: Sl 1, K to last 7 sts, (slide marker) p 6 sts, p1.
- Rep the last two rows, cont to slip marker as you come to it.
- Continue to work pattern as established until piece measures: 20”/51cm (20.5”/52cm, 21”/53.5cm, 21.5”/54.5cm, 22”/56cm) from beg, end with a RS row as the last row you work.
Shape Shoulder
- Row 1: (WS) cast off 1 (2, 3, 4, 5) sts, then work in pattern as established.
- Row 2: Work in pattern as established to end of row. 32 (37, 48, 53, 64) sts.
- Rep rows 1 and 2 a further 3 (4, 5, 6, 7) times more. 29 (29, 33, 29, 29) sts.
- Next row: Cast off 3 sts, work in pattern as established to the end of the row – (26, 26, 30, 26, 26) sts.
- Next Row: Work even in pattern as established.
- Rep last two rows: 3 (3, 3, 2, 1) more times. 17 (17, 21, 20, 23) sts.
Collar Extension
- Cont in pattern as established, slipping the first st and purling the last st for selvedges for about 3.5”/9cm (4”/10cm, 4”/10cm, 4¼ / 11 cm, 4 ¼ / 11 cm), ending with a WS row as the last row you work.
- Next row: Cast off 5 (6, 7, 7, 8) sts then work in pattern as established to end of row. 12 (11, 14, 13, 15) sts.
- Next row: Work even in pattern as established.
- Rep last two rows once more.
- Cast off rem: 7 (5, 7, 6, 7) sts.

Right Front
- Cast on 33 (39, 51, 57, 69) sts.
- Row 1: Sl 1, K to last 7 st, PM, p6, p1.
- Row 2: Sl 1, p6, slip marker, k to last st, p1.
- Rep the last two rows, cont to slip marker as you come to it.
- Continue to work pattern as established until piece measures: 20”/51cm (20.5”/52cm, 21”/53.5cm, 21.5”/54.5, 22”/56cm) from beg, end with a WS row as the last row you work (not the collar end).
Shape Shoulder
- Row 1: (RS) cast off 1, (2, 3, 4, 5) sts, then work pattern as established to end of row. 32 (37, 48, 53, 64) sts.
- Row 2: Work in pattern as established.
- Rep rows 1 and 2 a further 3 (4, 5, 6, 7) times more. 29 (29, 33, 29, 29) sts.
- Next row: Cast off 3 sts, work in pattern as established to the end of the row. 26 (26, 30, 26, 26) sts.
- Next Row: Work even in pattern as established.
- Rep last two rows: 3 (3, 3, 2, 1) more times. 17 (17, 21, 20, 23) sts.
Collar Extension
- Cont in pattern as established, slipping the first st and purling the last st for selvedges for about 3.5”/9cm (4”/10cm, 4”/10cm, 4 ¼ / 11 cm, 4 ¼ / 11 cm), ending with a WS row as the last row you work.
- Next row: Cast off 5 (6, 7, 7, 8) sts then work in pattern as established to end of row. 12 (11, 14, 13, 15) sts.
- Next row: Work even in pattern as established.
- Rep last two rows once more.
- Cast off rem: 7 (5, 7, 6, 7) sts.
Sleeves – Make 2
- Cast on 39 (45, 51, 57, 63) sts.
- Row 1: sl 1 (selvedge), k to last st, p1 (selvedge).
- Rep row 1 until the piece measures: 15.5”/40cm (16”/41cm, 16.5”/42cm, 16.5”/42cm, 15.5”/39.5cm) from beg.
Shape cap – top of sleeve:
- Rows 1-5: Bind off: S – 4sts / M – 5sts.
- Rows 1-6: L – 6sts / XL – 7sts / XXL – 8sts.
- Work in pattern as established to end of row – S = 19 sts / M = 20 sts in row 5 / L / XL / XXL: 15 sts in row 6.
- Cast off.

Finishing
- Sew shoulder seams – lay the pieces out on a large surface and align the fronts onto the back piece.
- Match up the shoulders and seam using the mattress stitch. Once you have done this, the next steps should seem easier to follow.
- Place markers on the side edges of the back and fronts, about:
- S – 5”/13cm / M – 5.5”/14cm / L – 6”/15cm / XL – 7”/17cm / XXL – 7.5”/19cm, below shoulder seams.
- Sew side and sleeve seams, leaving the lower 4 inches of the back piece unsewn. You can see in the photographs that the back piece is longer than the fronts.
- Sew ends of collar extensions together (the ends first with the mattress stitch) and stitch the edge of the collar extension to the back of the neck.
- You can see something similar in the making up of this cardigan pattern here – Cardigan Knitting Pattern (Stay Home + Be Cozy). This also has neck extensions that are sewn in the same way.
- Use a simple whip stitch seam for garter stitch sections, or your preferred seaming method, or the mattress stitch – Mattress Stitch – How To Seam Knitting
- Weave in loose ends.
Grab Your Printable PDF
Pattern Here…
Design Inspiration
I made this cardigan during a summer in Corfu, Greece, inspired by the teal-blue tones of the Ionian Sea.
The yarn color (Patina) reminded me of the sparkling water at Avlaki beach.
I wore this cardigan on a breezy day at the coast, when the wind picked up just before a storm — the oversized fit wrapped around me like a blanket.
It’s one of those pieces that makes you feel instantly at home, no matter where you are.


Helpful Resources
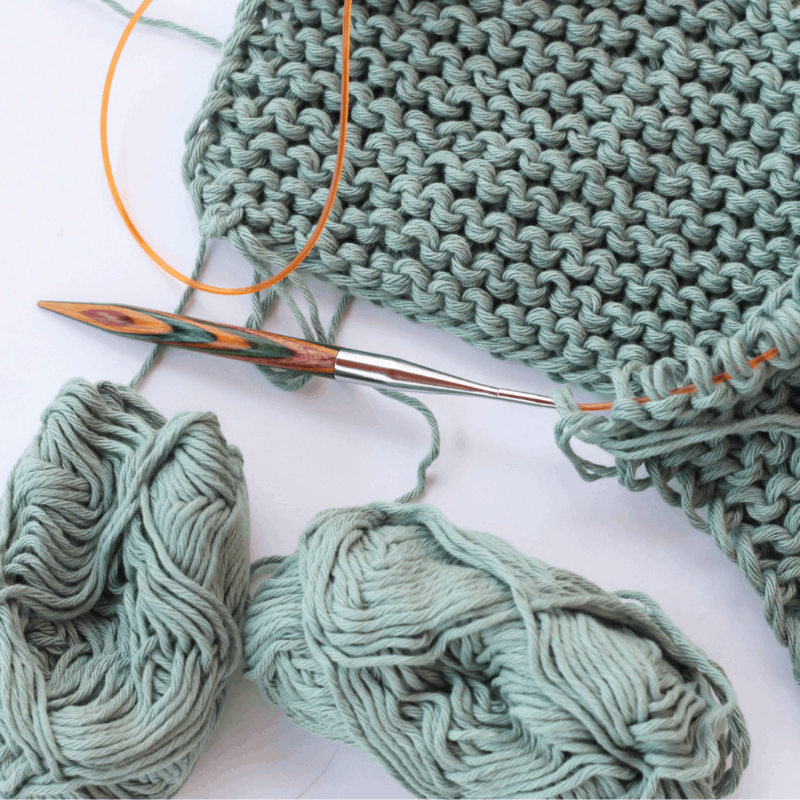
To make the cardigan, you mainly need to know how to knit and purl.
You will be creating the main knitted fabric of the piece in garter stitch (knitting every row), and the selvedge edges are where you need to do a purl stitch.
The purl stitches are also used when you create the collar that runs on the left and right fronts.
If you are new to knitting and still finding your feet with all of the knitting terms and abbreviations, you can find some tutorials and information here.
- Knitting abbreviations and terms (US and UK)
- How to cast on knitting
- How to cast off knitting for total beginners (step by step)
- How to knit garter stitch
- How to knit the purl stitch (for beginners + a video tutorial)

The cotton yarn I used is from Rico Design
The design of the loose-knit cardigan is basic – so simple yet also affordable, depending on the type of cotton or yarn you choose.
I used the Rico cotton knit with two strands together, and it didn’t break the bank.
This cotton is of good quality and yet affordable.
FAQs
Can beginners knit this cardigan?
Yes! If you can knit, purl, and work basic shaping, you can make this.
Can I use a different yarn?
Absolutely — try wool for winter or a cotton/acrylic blend for year-round wear.
How long does it take to make?
Most knitters finish in 2–3 weeks, depending on your pace.
Share your work with us…
I love seeing your finished projects on social media.
If you enjoyed making the cardigan, I’d love to see yours on Instagram, tag me @handylittleme.
Happy Knitting!

More Patterns You May Be Interested In…
- How To Knit A Hat For Complete Beginners (+ Video Tutorial)
- Cardigan Knitting Pattern (Fall Comfort)
- The sea glass shawl knitting pattern
- Rainbow Cardigan Knitting Pattern
- Chunky Cardigan Knitting Pattern
- 20 Temperature Blanket Patterns (The Ultimate Guide)
- How To Knit A Hat With Circular Needles (Step-By-Step)
- 31 Free Baby Blanket Knitting Patterns (Easy Knit Blankets)
- How To Knit Baby Booties (Step-By-Step)
- Knitted Dog Sweater Pattern (3 Sizes)
- 31 Cardigan Knitting Patterns (Free + Easy Ideas)
- Poncho Knitting Pattern (Easy Ripples and Ridges)
- 37+ Patterns To Use Up Your Yarn Stash (Small Projects)
- Free Dog Sweater Knitting Pattern (Straight Needles)
- Super Easy Corner To Corner Baby Blanket Pattern (Knit)
- Easy Baby Sweater Knitting Pattern For Beginners
- How To Knit A Baby Hat (Straight Needles)
- Pumpkin Knitting Pattern (Beginner Friendly!)
- Beach Knit Cover-Up (Free Knitting Pattern)
- Free Knitted Heart Pattern (Easy + Quick Project)
- 20+ Fall Oversized Knits (Sweater Knitting Patterns)
- Ribbed Beanie Knitting Pattern (Unisex Mariner’s Hat)
")
")
