Oversized Chunky Knit Sweater Pattern
THIS ARTICLE CONTAINS AFFILIATE LINKS THAT SUPPORT HANDY LITTLE ME CONTENT AND FREE PATTERNS.In this post, you will see an oversized chunky knit sweater pattern.
This thick sweater is a great project for beginner knitters who are ready to move on to their first garment.
The full pattern is free below, or you can purchase the ad-free printable PDF here.
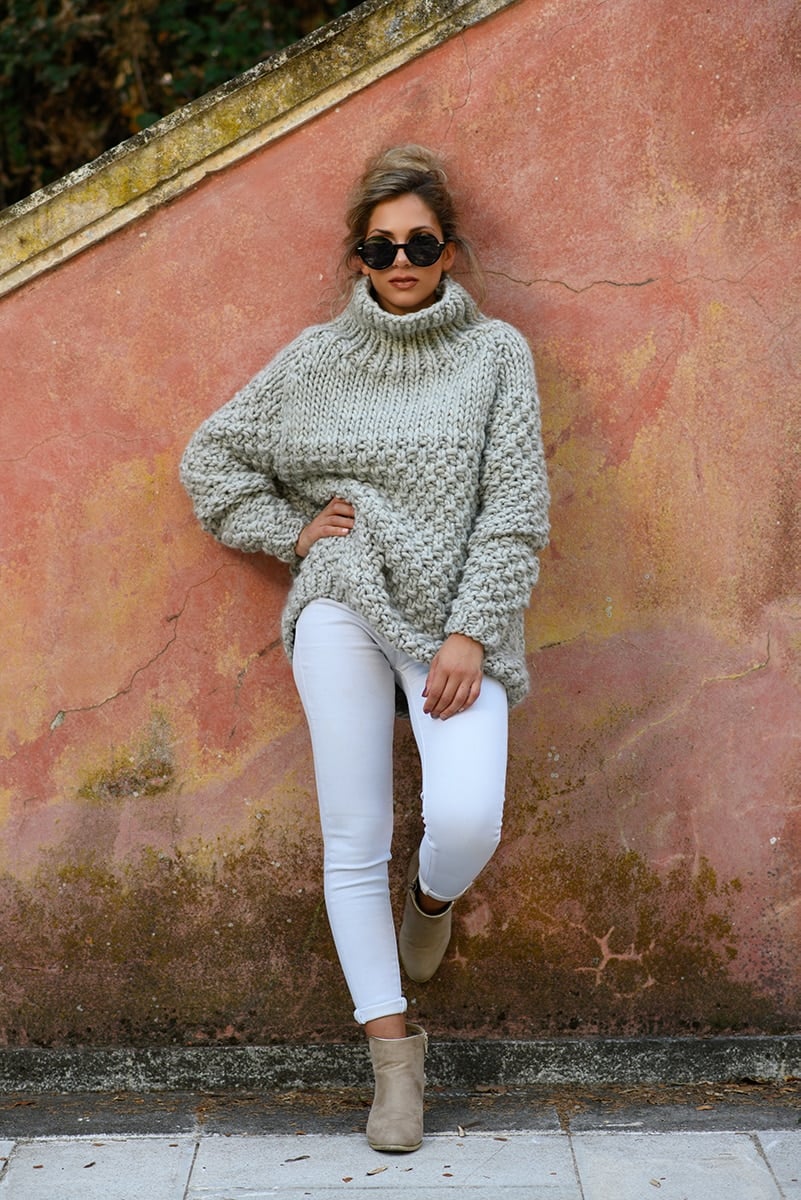
Make A Cozy Chunky Turtleneck Sweater
This oversized knit sweater is the ultimate project for anyone looking to create a cozy and stylish wardrobe staple.
Perfect as a first sweater project, this simple knit sweater features a back panel, front panel, and two sleeves that are straightforward to knit using large needles and chunky yarn.
The design includes a raglan shoulder, providing a relaxed, casual look that can be styled in different ways for any occasion.
With plenty of room to customize the sleeve width and experiment with different colors, this free knitting pattern is versatile and ideal for anyone wanting to craft their own unique chunky sweater.

The Yarn I Used
I made the sweater using The Wool (from We Are Knitters) in the color spotted grey.
This yarn is very warm to wear as it is 100% Peruvian wool.
The yarn weight is jumbo yarn/18-20 ply.

Skill Level
This sweater is for you if you are looking for an easy knitting project with minimal shaping.
The needle sizes you need are large (12mm/US 17 and 15 mm/US 19), making this a fairly fast, chunky women’s sweater to knit.
So, if you are an advanced beginner who is looking to make your first garment, this is a pretty quick, beginner-friendly pattern.

Helpful Resources
This pattern is great for beginner knitters looking to move on to their first garment.
- Knitting cast-on methods
- Knitting Lessons
- How to cast on knitting
- How to cast off knitting for total beginners (step by step)
- How to knit garter stitch
- How to knit the purl stitch (for beginners + a video tutorial)
- How to knit stockinette stitch (for beginners)
- How to read knitting patterns for beginners
- Knitting abbreviations and terms (US and UK)
- How to knit rib stitch patterns (1×1 and 2×2 ribbing)
- How to knit two stitches together (K2tog)
- How to knit – a complete beginner’s guide

Oversized Chunky Knit Sweater Pattern
Grab your inexpensive, ad-free, PDF printable pattern in my shop here.
Notes
Skill Level – Easy (Advanced Beginners)
This sweater knitting pattern will work up into the perfect slouchy warm knit you need to stay cozy!
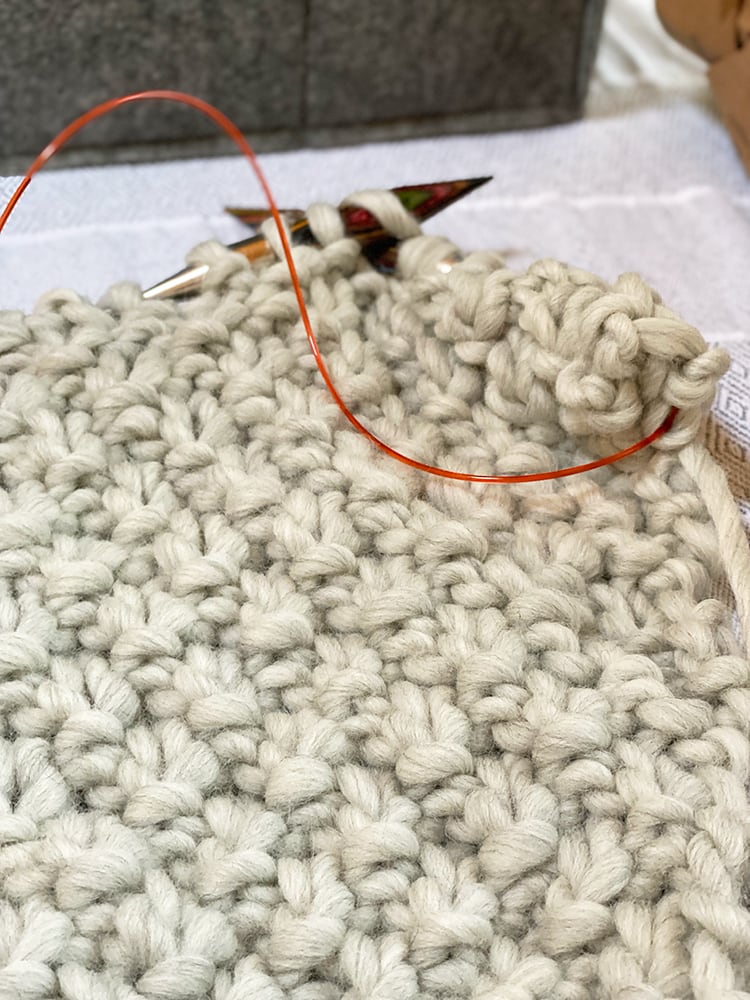
The sweater is knit in Irish moss stitch and stocking stitch for the main body with ribbed cuffs and a ribbed collar.
You will see plenty of stitch definitions with this yarn and enjoy an oversized fit.
If you like this pattern, you may also enjoy this chunky turtleneck sweater knitting pattern.
And…if you prefer a cardigan, you may like this chunky cardigan knitting pattern.
Copyright Info
- Please do not copy, sell, redistribute, or republish this pattern.
- If you wish to share this pattern, please provide a link to the pattern page only.
- You may sell items produced using this pattern.
- Do NOT use the copyrighted photos for your product listing.
- For the copyright T&C, please read my Terms of Use.
Size Information/Measurements
Adult/Woman – S (M, L, XL, 2XL, 3XL)
Bust Circumference
To fit bust size as follows:
- S – 32 inches/81.28 cm
- M – 36 inches/ 91.44 cm
- L – 40 inches/ 101.6 cm
- XL – 44 inches/111.76 cm
- 2XL – 48 inches/ 121.92 cm
- 3XL – 52 inches/ 132.08 cm
Waist/Bust (Around)
- S – 46 inches/ 116.84 cm
- M – 50 inches/ 127 cm
- L – 54 inches/ 137.16 cm
- XL – 58 inches/ 147.32 cm
- 2XL – 62 inches/ 157.48 cm
- 3XL – 66 inches/ 167.64 cm
Length (Straight – Shoulder to hem)
- S – 27 inches/ 68.58 cm
- M – 27.5 inches/ 69.85 cm
- L – 28 inches/ 71.12 cm
- XL – 28.5 inches/ 72.39 cm
- 2XL – 29 inches/ 73.66 cm
- 3XL – 29.5 inches/ 74.93 cm
Sleeve Length (Underarm to cuff)
- S – 15.5 inches/ 39.37 cm
- M – 16 inches/ 40.64 cm
- L – 16.5 inches/ 41.91 cm
- XL – 17 inches/ 43.18 cm
- 2XL – 17.5 inches/ 44.45 cm
- 3XL – 18 inches/ 45.72 cm
Cuff (Around)
- S – 10 inches/ 25.4 cm
- M – 11 inches/ 27.94 cm
- L – 11 inches/ 27.94 cm
- XL – 12 inches/ 30.48 cm
- 2XL – 12 inches/ 30.48 cm
- 3XL – 12.5 inches/ 31.75 cm
Notes on sizing
In the photographs, the model is wearing a small size (S – 32 inches/80 cm).
The sweater is very oversized, so the small size will also fit a medium-sized person, and so on.
There is no need to size up if you think your size might be a snug fit.
The pattern is written for all sizes, starting with the small size, with changes for different sizes listed in all necessary places.
To follow the pattern more easily, circle or highlight all numbers pertaining to your size before beginning.
Gauge – 6 sts x 8 rows = 4×4 inches /10×10 cm In stocking stitch – with the 15mm (US 19) needles.

Pattern Notes
- The sweater is worked in 4 pieces: Back, Front, and 2 Sleeves.
- Each piece is worked in two stitch patterns (Irish moss stitch and stocking stitch) from the lower edge upwards, beginning with a ribbed lower band.
- Circular needles are used to accommodate the number of stitches.
- Work back and forth on the circular needle as if working on straight needles.

The Supplies You Need
Yarn
- We Are Knitters The Wool (200g/87 yds/80m) in Spotted Grey x 6, (7, 8, 8, 9, 10) balls.
- This is a Jumbo weight yarn/18-20 ply yarn.
- *Please note you could substitute this yarn with Super Bulky/Super Chunky/14 Ply Yarn, but it is slightly thinner than the yarn used.
- Remember to match any yarn substitute to the main needle size – 15 mm (US 19) knitting needles.
- Learn how to substitute yarn here – How To Substitute Yarn In A Knitting Pattern
Needles
- 12 mm (US 17) knitting needles.
- 15 mm (US 19) knitting needles.
- I used my set of interchangeable circular needles and a set of 15mm (US 19) circulars, as there were many stitches to cast on, and it was easier to use the cables.
- I also used spare cables with end caps to hold spare stitches when needed.
Notions
- Tape measure
- Darning needle
- Scissors
- Stitch holders x 3 or spare cables with end caps.
Abbreviations
- Beg = Beginning
- CO = Cast on
- Cont = Continue(ing)
- Dec = Decrease (Cast off)
- Foll = Following
- K = Knit
- K2tog = Knit the next two stitches together
- KFB = Knit into the front and back of the stitch (increase)
- P = Purl
- P2tog = Purl the next two stitches together
- Rem = Remaining
- Rep = Repeat
- RS = Right side
- St(s) = Stitch(es)
- St, St = Stocking Stitch (K 1 row, P 1 row)
- WS = Wrong side
Stitch pattern notes
1 x 1 ribbing = K1, P1 (It is obtained by alternating knit and purl stitches in one row and “knitting by pattern” in every next row.
This means that we make a knit stitch when the previous row stitch looks like V and make a purl stitch when the previous looks like a bump.)
Cast On: an even number of stitches.
- Row 1 (RS): (k1, p1) till the end of the row.
- Row 2 (WS): (k1, p1) till the end of the row.
Repeat these two rows.
Print + Stitch
Purchase the ad-free PDF pattern
Want a clean, printable version of this pattern? You can purchase the ad-free PDF in my shop. It’s perfect for printing, saving to your device, and making without distractions.
Sweater Pattern Instructions
Back
With 12 mm (US 17) knitting needles CO 36 (38, 40, 44, 46, 48) sts.
Work in 1 x 1 ribbing until the piece measures 2 inches from the CO edge, ending on a WS row.
Change to 15 mm (US 19) knitting needles.
- Row 1 (RS): *P1, K1 – Rep from * to the end of the row.
- Row 2 (WS): *P1, K1 – Rep from * to the end of the row.
- Row 1 (RS): *K1, P1 – Rep from * to the end of the row.
- Row 2 (WS): *K1, P1 – Rep from * to the end of the row.
Cont to work in the Irish moss stitch pattern, repeating rows 1-4 until the piece measures 15 (15.5, 16, 16.5, 17, 17.5) inches from the CO edge, ending with a WS row.
Shape Raglan
Still working in the Irish moss st patt and making new patts when sts are decreased.
- Row 1 (RS): Cast off 2 (2, 2, 4, 4, 4) sts at beg of the row, work in patt to the end of the row.
- Row 2 (WS): Cast off 2 (2, 2, 4, 4, 4) sts at beg of the row, work in part to the end of the row. 32 (34, 36, 36, 38, 40)sts.
Then dec 1 st at each end of every foll 3rd row until 28 (30, 32, 32, 34, 36) sts.
*You are changing the stitch pattern now to stocking stitch (RS row knit, WS row purl)
Now work in st st and cont to dec 1 st each end of every foll 3rd row until 20 (22, 22, 24, 26, 26) sts remain.
End on a WS row, so that the next section starts on an RS row.
Leave these sts on a spare needle/stitch holder or cable with end caps.

Front
With 12 mm (US 17) knitting needles CO 36 (38, 40, 44, 46, 48) sts.
Work in 1 x 1 ribbing until the piece measures 2 inches from the CO edge, ending on a WS row.
Change to 15 mm (US 19) knitting needles.
- Row 1 (RS): *P1, K1 – Rep from * to the end of the row.
- Row 2 (WS): *P1, K1 – Rep from * to the end of the row.
- Row 1 (RS): *K1, P1 – Rep from * to the end of the row.
- Row 2 (WS): *K1, P1 – Rep from * to the end of the row.
Cont to work in the Irish moss stitch pattern, repeating rows 1-4 until the piece measures 15 (15.5, 16, 16.5, 17, 17.5) inches from the CO edge, ending with a WS row.
Shape Raglan
Still working in the Irish moss st patt and making new patterns when sts are decreased.
- Row 1 (RS): Cast off 2 (2, 2, 4, 4, 4) sts at beg of the row, work in patt to the end of the row.
- Row 2 (WS): Cast off 2 (2, 2, 4, 4, 4) sts at beg of the row, work in patt to the end of the row. 32 (34, 36, 36, 38, 40)sts.
Then dec 1 st at each end of every foll 3rd row until 28 (30, 32, 32, 34, 36) sts
*You are changing the stitch pattern now to stocking stitch (RS row knit, WS row purl)
Now work in st st and cont to dec 1 st at each end of every foll 3rd row until 20 (22, 22, 24, 26, 26) sts remain.
End on a WS row, so that the next section starts on an RS row.
- On the next RS row, K 6 sts, then place the central 8, (10, 10, 12, 14, 14) sts for the neck onto a stitch holder, then place the remaining 6 sts onto another stitch holder.
- There will be 6 sts on either side of the neck.
- Each side of the neck will now be worked separately.
Shape Neck
Keeping the raglan shaping correct, work the following:
- Row 1: P to the end of the row.
- Row 2: K to last 4 sts, K2tog twice.
- Row 3: P to the end of the row.
- Cast off rem 4 sts.
With RS of work facing you – place the 6 sts from the st holder onto the needles and rejoin the yarn for the other side of the neck.
Reverse the shaping as follows:
- Row 1: P to the end of the row.
- Row 2: K2tog twice, K to the end of the row.
- Row 3: P to the end of the row.
- Cast off the rem 4 sts.

Left Sleeve
With 12 mm (US 17) knitting needles CO 14 (16, 16, 16, 18, 18) sts.
Work in 1 x 1 ribbing until the piece measures 2 inches from the CO edge, ending on a WS row.
Change to 15 mm (US 19) knitting needles.
- Row 1 (RS): *P1, K1 – Rep from * to the end of the row.
- Row 2 (WS): *P1, K1 – Rep from * to the end of the row.
- Row 1 (RS): *K1, P1 – Rep from * to the end of the row.
- Row 2 (WS): *K1, P1 – Rep from * to the end of the row.
Cont to knit in the Irish moss stitch pattern, repeating rows 1-4 until the piece measures 4 inches from the CO edge, ending with a WS row.
Shape Sleeves
Please note – (Cont to work in Irish Moss St) As you make increases you will be forming new stitch patterns.
Row 1 (RS): KFB into the first and last stitch of the row. (2 sts increased)
Rep row 1 (increasing 2 sts) on every foll 8th (6th, 6th, 4th, 4th, 4th) row, 3 (3, 3, 4, 5, 5) more times. 22 (24, 24, 26, 30, 30) sts.
Cont to work in patt until sleeve measures 15.5 (16, 16.5, 17, 17.5, 18) inches from the CO edge.
*At this point check that you are happy with the length of the sleeves – they should start just below the underarm. If you need to make them longer, work more rows, but if you prefer a shorter sleeve you may need to pull out (frog) a few rows.
Shape Raglan
Please note – Cont in Irish Moss St
- Row 1(RS): Cast off 2 (2, 2, 3, 3, 4) sts at the beg of the row, work in patt to end.
- Row 2: Cast off 2 (2, 2, 3, 3, 4) sts at the beg of the row, work in patt to end.
- Row 3: Work in patt to the end of the row.
- Row 4: Work in patt to the end of the row.
- Row 5: Dec row (RS): Cast off 1 st, work in patt to last 2 sts, cast off 1 st. (2 sts decreased)
- Row 6: (WS): Work in patt to the end of the row.
- Rep rows 3-6 until you have 14 sts
*You are changing the stitch pattern now to stocking stitch (RS row knit, WS row purl)
- Now work in st st – rows 5-6 only until you have 6 sts.
- Cast off 3 sts – work in patt to the end of the row.
- Work in patt to the end of the row.
- Cast off rem 3 sts.

Right Sleeve
Work as for the left sleeve until you have 6 sts left on the needle.
Shape Raglan
- K 3 sts, cast off the rem 3 sts, break yarn, and secure.
- Rejoin the yarn to the first stitch and P to the end of the row.
- Cast off rem 3 sts.

Making Up
You can find a mattress stitch tutorial here – Mattress Stitch – How To Seam Knitting
Tip
It’s best to work on a large surface (like a dining table or desk) so you can lie the pieces out flat and see where you will be seaming.
Step 1
Seam the back right raglan sleeve seam using the mattress stitch. Make sure the right sides are facing you.
Step 2
Join the right sleeve seam to the front raglan seam using the mattress stitch.
Make sure the right sides are facing you.
Step 3
Join the left raglan sleeve seam to the front raglan seam using the mattress stitch.
Make sure the right sides are facing you.
Step 4
Leave the left-back raglan seam open for now.
With the RS of work facing you, use the 12mm (US 17) knitting needles and do the following:
- Pick up and knit 12 (12, 14, 14, 16, 16) sts from the side front neck edge and top of the sleeve.
- Then K across the 8 (10, 10, 12, 14, 14) sts from the stitch holder at the center front.
- Then pick up and knit 12 (12, 14, 14, 16, 16) sts from the side front neck edge and top of the sleeve.
- Finally, K across the 20 (22, 22, 24, 26, 26) sts from the spare stitch holder at the back.
Please note the neck is now worked back and forth – not joined in the round.
Work in 1 x 1 ribbing (K1, P1) for 6 inches (or your desired length), ending with a WS row.
Cast off the rem sts in rib.
Step 5
Join rem back raglan seam and cont up the neck ribbing.
Step 6
Join side and sleeve seams using the mattress stitch.
Then, you can weave in any leftover loose ends.
I also like to use a lint roller to clean the garment afterward in case of any fluff, pet hair, etc!
Grab The Inexpensive PDF Pattern In Other Languages
Share Your Make
I love seeing your finished projects on social media.
If you enjoyed making the sweater, I’d love to see yours on Instagram, tag me @handylittleme or #handylittleme to be featured.
If you are on Facebook, stop over to the handylittleme Facebook group and share a photo.
I’d love to see your work.
Happy Knitting!
More Free Patterns
- How To Knit A Hat For Complete Beginners (+ Video Tutorial)
- 20 Temperature Blanket Patterns (The Ultimate Guide)
- How To Knit A Hat With Circular Needles (Step-By-Step)
- 31 Free Baby Blanket Knitting Patterns (Easy Knit Blankets)
- Chunky Cable Knit Sweater Pattern
- Knitted Dog Sweater Pattern (3 Sizes)
- 12 Simple Knitting Stitches For Beginners
- Forest Haze Sweater Knitting Pattern
- 37+ Patterns To Use Up Your Yarn Stash (Small Projects)
- Cardigan Knitting Pattern (Fall Comfort)
- Super Easy Corner To Corner Baby Blanket Pattern (Knit)
- Easy Baby Sweater Knitting Pattern For Beginners
- How To Knit A Baby Hat (Straight Needles)
- Pumpkin Knitting Pattern (Beginner Friendly!)
- Circular Knitting: Bottom-Up Sweater Knit In The Round
- Cozy Cottage Moss Stitch Sweater Knitting Pattern
- Free Knitted Heart Pattern (Easy + Quick Project)
- 20+ Fall Oversized Knits (Sweater Knitting Patterns)
- Ribbed Beanie Knitting Pattern (Unisex Mariner’s Hat)
This is the most beautiful sweater, it looks like a designer sweater you see in boutiques.the pattern and your directions are excellent, i have been looking for a design like this to knit for so long.
If you are 5’2″, will the length be ok? I Realize the sweater is styled to drape as shown. Thank you for a great pattern and super simple directions.
Hello Jen,
I’m so happy you like the sweater.
I think that the length will be fine, I am 5″3 and the model in the photos (my friend Nikoletta) is around 5″4 so it’s not super long.
But when you knit the front or back piece, you can get to the point where you need to cast off for the armholes and see if the length is ok or not – holding it up against yourself and measuring.
I hope that helps and happy knitting!
Louise
This is beautiful! I was wondering..do you think the woolease thick and quick would work as well?
Hello Colleen,
I’m so happy you like the sweater!
Yes, I think that Wool ease thick, and quick will also work for this sweater pattern.
I haven’t tried it but the yarn weight is the same – so it will be ok.
Both of those yarns, when knit up, are very thick and heavy, I made the long chunky cardigan in Lion Brand Wool ease thick and quick in graphite and it is very similar.
I saw that another knitter had chosen a similar yarn called Grey River Chill by Sugar Bush – maybe you can check that out too.
I hope that helps!
Louise
Thankyou so much Louise. I’m also happy that the comment above mine mentioned length, as I am only 5’ tall….lol…I will take a look at the sugar bush yarn as well. 🙏
So pleased I found your chunky sweater pattern on Pinterest, I am 70 years old and have done a bit of knitting years ago. I have now subscribed to you and just love getting your emails. You explain everything so clearly and cover pretty much everything anyone could possibly need to know. Thank you so much. I am passing on your info to some of my 15 grandchildren who are learned to knit.
Hello Sally,
Thank you so much for your kind words, I am so happy you like the patterns and emails. 🙂
Happy knitting!
Louise
Hello again😊
I have a question,i have many skeins of #4 yarn, enough to make this sweater if i double strand,
do you think this would work.i love the ease of this pattern and i think it wb withinh same thickness range on needle sizes called for.
what do you think?
Thank you.
Hello Jen,
You could try it but changing the yarn thickness will impact the overall finish of the sweater.
Even knit with two strands together the medium 4 yarn will not have the same look as the super bulky.
But you could definitely try it out to see how it goes?!
That’s the exciting thing about the fiber arts, you can experiment and create something amazing by changing things up a bit!
Let me know how it goes 🙂
Louise
What length circular needles did you use?
Hello Natasha,
You can use a longer cable size – around 100cm/40″ for the back and front and the same or a shorter size cable (24″) for the sleeves if you wish.
Better to use a longer cable for the front and back so you can see the stitches and the size it is taking as it knits up.
I hope that helps!
Louise
Good morning. Congratulations on the sweater: it’s wonderful !! I would love to make one for myself and I tried to translate the pattern using Google translate … you couldn’t understand anything !!! Is it possible to have the translation in Italian? Thanks for any reply, greetings ,Sabina
Hello Sabina,
Sorry but this pattern is only available in English…
Sorry about that!
Louise
Hi there, I’m excited to try this sweater. I’m 5’2”, 125lbs but a little bustier, like 34-36. I think the small would be perfect except for the bust, what do you think? Thanks!
Hello Staci,
I think the small would be fine, it’s quite oversized, so it will be ok for you I think!
Happy knitting!
Louise
I am trying to determine which size to make. I’m 5’4 and measuring 36-37” for the bust. Do I go with the small or medium size? It’s a difference of two stitches with CO but don’t want it to be so big that I can’t wear it. Can you let me know?
Hello Jennifer,
I would probably go with the small size because if you use the same yarn the medium size would be large on your frame I think.
I hope that helps,
Louise
good afternoon. I am currently working on this sweater for my daughter and I’m stumped on the back side instructions. I hope you can clarify where it states to “dec1 at each end of every following 3rd row. thank you
Hello Ana,
This means to decrease 1 stitch at each end of every following 3rd row.
You can decrease by knitting two stitches together or by casting off one stitch.
I hope that helps!
Louise
Hi Louise!
I’m a beginer knitter and this is my first sweater ever 🙂 I’m getting to the kneck and I’m wondering if there is any tutorial about rejoining the yarn for the other side of the kneck… I’m a bit clumsy and I don’t want it lo look bad…
Thanks a lot!
Hello Ada,
Sorry, I don’t have a tutorial for that.
You can rejoin the yarn by threading the working yarn through a yarn needle and through the first loop on the needle where you need to start knitting again.
I hope that helps!
Louise
Hi again Louise!
I’m kind of stucked here… at the end of the front side it says: knit 6 stitches and place the central 10 in a stitch holder and the remining 6 in another holder… After that we have to work on the shape kneck: Row 1: P to the end of the row.
Row 2: K to last 4 sts, K2tog twice.
Row 3: P to the end of the row.
Cast off rem 4 sts.
Once we are done we rejoin the yarn to start working with the other 6 stitches, and here’s my question: shouldn’t we knit those 6 stitches too?
I hope my comment is clear because English is not my first language…😅
Thanks for your help!
Hello Ada,
You have to shape both sides of the neck.
You complete the shaping on the first side, then continue to shape the other side – reversing the shaping.
Try it as the pattern states and see how that looks.
Thanks,
Louise
Thanks a lot for your answers Louise!
Hi,
I’m struggling to find the correct wool to make this sweater. Do I have to use 200g or can I use 100g balls? ( I’m not sure if this relates to size of ball or is to do with the thickness of the strand?
Could you please advise?
I love the sweater and really want to make it.
Kind regards
Heather
Hello Heather,
You can use 100g balls instead of 200g but you will have to check you have enough to make the sweater – check the meters and yards of the yarn I used for this sweater to calculate how much you need for the size you want to make.
This has nothing to do with the thickness of the yarn – this is known as yarn weight and only refers to the thickness of the yarn, this is super bulky weight (also known as super chunky).
I hope that helps,
Louise
Hi there,
I have finished the panels for this sweater but am not sure I understand your directions for putting it together. When you say “Seam Back Right Raglan Sleeve” does that mean stitch the sleeve up? Without attaching it to the sweater first? Sorry, I’m just very visual and am having a hard time understanding the steps for each sleeve here.
Hello Staci,
That means sewing the back right raglan (the back piece) to the sleeve raglan (one side of a sleeve raglan).
You don’t seam the sleeves up just yet.
You are attaching the sleeves to the back and then front sections before starting to finish the neck.
I hope that helps!
Louise
I am also struggling putting the pieces together. How are the notch in the front, back and sleeves supposed to fit together? A diagram of how they join together would be helpful. Other than not being ble to assemble I have loved this pattern.
Hello Alli,
Thank you so much, I’m really happy to hear you’ve loved the pattern!
For assembling the sweater, I would recommend following all of the finishing steps one by one in the order they are written, as each step helps the next part line up correctly.
The notches are there as guide points for matching the front, back, and sleeves together.
Before seaming, lay the pieces flat with the right sides facing you and pin or clip the notched areas together first, then pin the rest of the seam evenly before sewing.
This can make it much easier to see how everything fits before committing to the seam.
Take your time with each section, and if anything looks twisted or uneven, unpin and adjust before seaming.
I hope that helps!
Louise
This is so beautiful <3
I had to buy it and can't wait to knit this when the weather gets colder here in Denmark.
Thank you 🙂
Oh! By the way, do you have a # we can use to show off our finished sweaters on Instagram for example?
Hello Frida,
Thank you for your kind words, I’m so happy you like the sweater pattern.
Yes, you can #handylittleme on IG to share your work with us.
Happy knitting!
Louise
I love this pattern! I have never actually made anything in an adult size before, as I usually only make hats, gloves and leg warmers. But I will definitely try this one. You made me laugh with the “Fall is here” comment! Still triple digits in most of Texas and low 90’s here in Florida! But I will need this sweater in January! Thanks again for sharing.
Hello Carol,
I hope you enjoy the pattern!
Louise
I really, really want to make this sweater! I’m having some affordability problems. My skills are advanced beginner, I’d say. If I combine a super-bulky yarn, size 6 with an Aran weight yarn, size 4, would I have a yarn equal to the weight I need? The super-bulky is Bernat’s Softee Chunky, and the Aran weight is Red Heart Soft. Would the same hold true for some of the other yarns in jumbo weight, such as the emerald green one with the single cable? I love your basic “recipe” for the pullover sweaters, but I can’t justify the expense of new yarn until I work down my stash just a little bit.
Much appreciation for all the enjoyment I have had from your patterns, especially the Outlander pieces. I’ve learned a lot while doing. I hope you are having a merry Christmas holiday, and all the best for a terrific 2024.
Anne
Hello Anne,
Thank you for your kind words, I am so happy you enjoy the patterns 🙂
You could experiment with the yarn you have, a good idea is to make some gauge swatches and see if anything comes close to the gauge for the sweater.
Happy knitting!
Louise
Hi there, im from SA and would really like to buy the correct yarn for this sweater….If you could please let me know where I can buy the wool for this project then I can have it shipped to me
Kind Regards Yvonne
Hi Yvonne,
Thank you so much for your comment.
For this sweater, I used The Wool from We Are Knitters in the color Spotted Grey, which is a jumbo weight yarn (18–20 ply).
If you’re unable to get that exact yarn in South Africa, I would recommend looking for a similar jumbo/super chunky wool with a comparable gauge.
You may also be able to order directly from We Are Knitters, depending on their shipping options to your area.
I hope that helps, and happy knitting!
Warm wishes,
Louise
Hi Louise
Thank you for your reply, unfortunately We Are Knitters do not ship to South Africa, and I have really not been successful in trying to get a suitable substitute here….I really want to knit this sweater for my daughter with the correct suggested yarn … can anyone point me in the direction of a shop that does stock this wool and will ship to South Africa
Yvonne O’Kelly
Hi Yvonne,
I’m sorry you haven’t been able to get The Wool shipped to South Africa.
The yarn used in the pattern is The Wool from We Are Knitters, which is a super bulky/jumbo 100% wool yarn, so finding an exact match can be tricky.
A couple of South African options you could look at are African Expressions Inspire from I Love Yarn, and some of the super chunky wool options stocked by Skapie.
They won’t be exact matches, but they may give you a similar result.
You could also try a yarn substitute tool like Yarnsub to compare yarn weights and meterage before buying.
If you’d like to match the sweater as closely as possible, I’d look for a super bulky/jumbo wool yarn with a similar thickness and then knit a gauge swatch first to check the size and fabric.
I hope that helps a little!
Warm wishes,
Louise
Hi Louise,
thank you so much for your help…i have finally managed to locate a farm in South Africa who have alpaca and spin yarn, they are called quenti alpaca mill located in Wellington
They do not produce the Chunky size yarn, but suggested that I try there blend of 50% merino/50% alpaca dk yarn by knitting 2 strands together
there other suggestion was there blend of 40% merino, 40% alpaca and 20% bamboo blend also in dk by knitting 2 strands together
Do you think that this could work for the sweater ?
sorry for asking so many questions, but the wool in SA is quite expensive and I really want to make a beautiful sweater for my daughter and im just a bit nervous about batching the project because its going to be quite expensive to make
Both wool suggestions are very similar in price, but I was wondering if the 2nd choice (40% alpaca, 40% merino, 20% bamboo) might be better for our climate….
Regarding
Yvonne
Hi Yvonne,
I think two strands of DK may still be too thin for this sweater if you want it to have the same chunky look as the original. For this pattern, a bulkier yarn would probably be a better option.
I know that others have made it successfully using one strand of a super bulky yarn such as Lion Brand Wool Ease Thick & Quick, so that may be a better guide when looking for a substitute.
You could also ask in the Facebook group, as someone there may know of a good South African yarn that would work well for this pattern.
I hope that helps a little, and I completely understand wanting to be careful before investing in the yarn.
Warm wishes,
Louise