Knitted Pumpkin Pattern (Small + Quick)
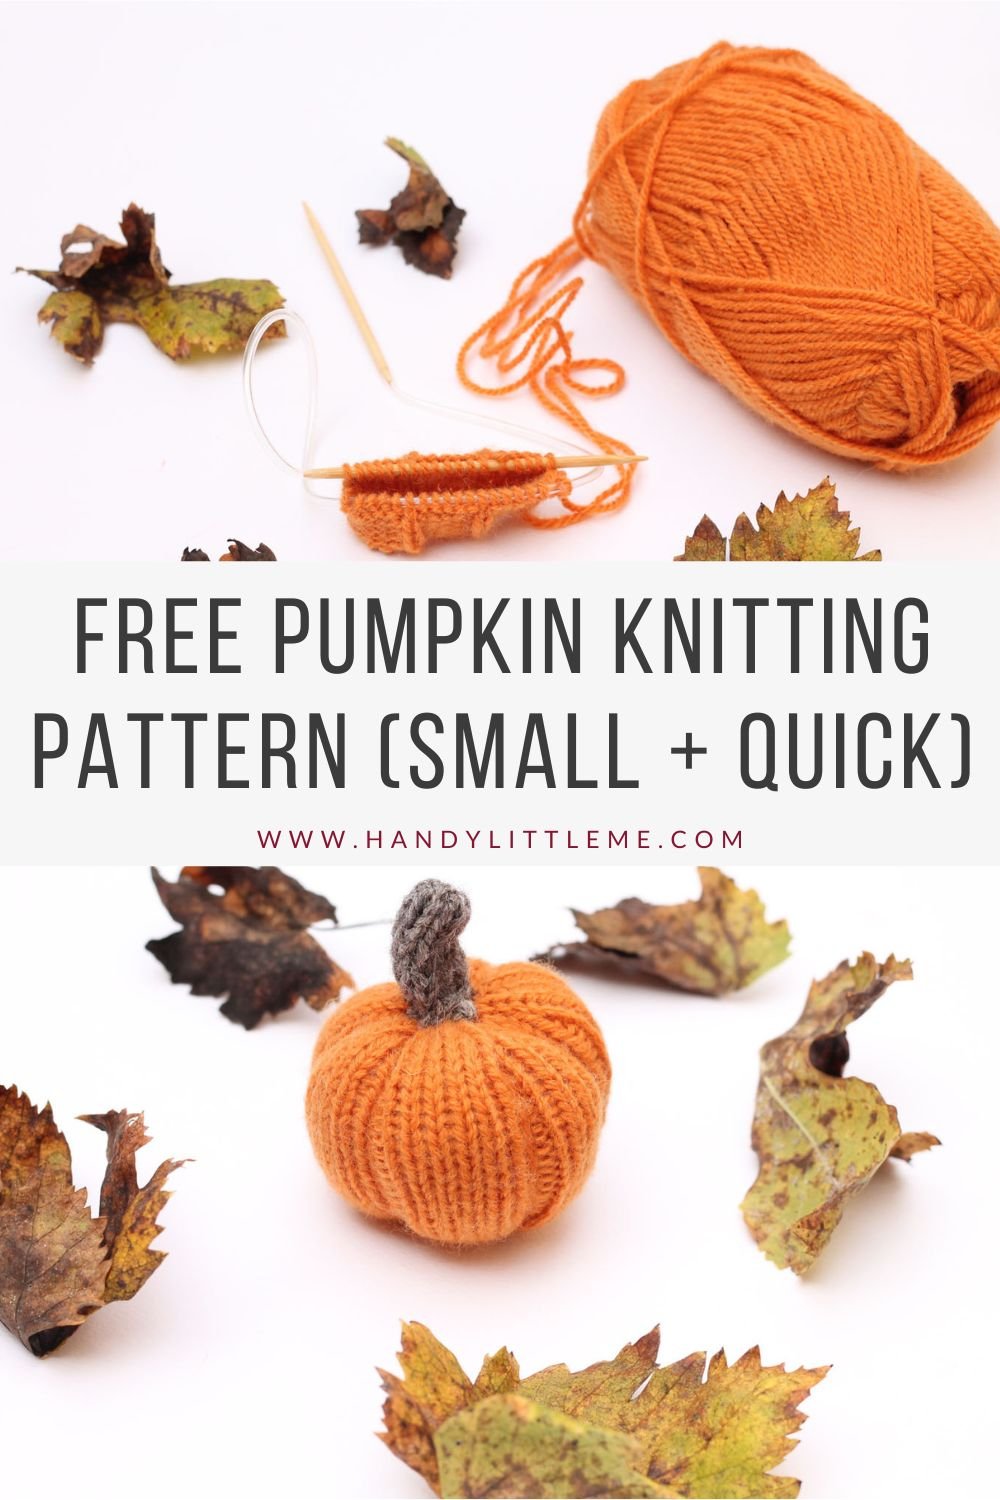
THIS ARTICLE CONTAINS AFFILIATE LINKS THAT SUPPORT HANDY LITTLE ME CONTENT AND FREE PATTERNS.In this post, you will see an easy and quick knitted pumpkin pattern.
I wanted to make something pretty for autumn as a decoration for my home and decided to make a cute mini pumpkin!
Make your own pumpkin patch for your home fall decor and last-minute fall gifts.
Plus as this cute little pumpkin needs less than a skein of yarn making one is a great way to use up any leftover yarn left in your stash.
Scroll down for the free pattern or you can grab your printer-friendly, ad-free PDF here.
An Easy-Level Knitting Pattern
This is an easy pattern for those of you who are advanced beginner level, and the techniques you will need to know are knit, purl, k2tog, and knitting in the round.
Using mainly knit and purl stitches, this pattern will also introduce you to decreasing and shaping.
Plus they are really fast to knit, perfect for new makers.
For an average knitter, knitting a mini easy pumpkin can take anywhere from 1 to 4 hours.
Some experienced knitters might even finish it in less time, especially if they’re familiar with the pattern or have made similar items before.
Beginners or those who knit at a more relaxed pace might take a bit longer.

Knit Your Own Pumpkin Patch
Knitted pumpkins have a different texture compared to crocheted ones. The stitches in knitting can create a denser, more substantial fabric, giving your pumpkin a cozy and plush feel.
Knitting allows for a wide range of stitch patterns, from basic garter and stockinette stitches to more intricate cables and lacework.
This variety lets you create pumpkins with unique and eye-catching designs.
The nature of knitted fabric often makes knitted pumpkins sturdy and long-lasting.
They can withstand handling and storage for years, becoming beloved seasonal decorations.
Plus hand-knitted pumpkins make thoughtful and heartwarming gifts.
You can customize each one to match the recipient’s taste and style, making them feel extra special.
And it can be a fun craft you can make with your older children.
The Yarn I Used…
I made the small knitted pumpkin using a lightweight (03) yarn (DK yarn) in orange with scraps of brown for the stalk.
This was knit up quite quickly and used leftovers in my yarn stash, around 20g per pumpkin.
Any DK yarn, light worsted weight, or 8 Ply yarn will be okay to use for this pattern.

More Free Pumpkin Knitting Patterns
This pumpkin pattern is excellent for any advanced beginners.
For more quick knit pumpkins please take a look at these posts, to find plenty of modern designs, perfect for all makers from beginners to intermediate knitters.

Knitting Lessons
Check out the knitting lessons to find more knitting tutorials – Knitting Lessons (With Video Tutorials)
For example, how to cast-on stitches, how to knit the basic stitches like the stockinette stitch, how to knit ribbing, how to make knitting increases and decreases, how to fix knitting mistakes and many many more.
- Get a tutorial on how to cast on here – How To Cast On Knitting
- Learn how to knit the stockinette stitch here – How To Knit Stockinette Stitch (For Beginners)
- Check out a tutorial on how to knit the rib stitches here – How To Knit Rib Stitch Patterns (1×1 and 2×2 ribbing)
- Plus if you are a new knitter looking for an easy first project check out this hat pattern you can make with bulky yarn and straight knitting needles – How To Knit A Hat For Complete Beginners (+ Video Tutorial)
- For more simple knits check out my beginner pattern library here – Beginner Knitters – Handy Little Me
The majority of the blog posts include a video tutorial to help you along.
Perfect for beginner knitters who want to learn a new technique or experienced knitters who need a refresher.
Related Post: How to Knit – A Complete Beginner’s Guide
Resources and tutorials you may find helpful in following this pattern:
- Knitting cast-on methods
- Knitting Lessons
- How to cast on knitting
- How to cast off knitting for total beginners (step by step)
- How to knit garter stitch
- How to knit the purl stitch (for beginners + a video tutorial)
- How to read knitting patterns for beginners
- Knitting abbreviations and terms (US and UK)
- How to join knitting in the round with circular knitting needles
Knitted Pumpkin Pattern
Grab the inexpensive ad-free printable pattern in my shop here.
Skill Level – Easy
Notes
The pumpkin knits up quickly in DK yarn, and the simple design makes for a relaxing and enjoyable knit.
Copyright Info
- Please do not copy, sell, redistribute, or republish this pattern.
- If you wish to share this pattern, link to the pattern page only.
- You may sell items produced using this pattern.
- Do NOT use copyrighted photos for your product listing.
- For the copyright T&C please read my Terms of Use.
Size – Circumference – 8″ / 21 cm / Height – 3″ / 8cm
Gauge – 18 sts and 24 rounds in 4×4 inches / 10×10 cm
The Supplies You Need
Yarn
- 1 x skein or scraps of orange DK/light worsted/8 ply yarn.
- scraps of brown DK/light worsted/8 ply yarn.
- Yarn Weight Guide (+ Conversion Chart)
Needles
- 4 mm (US 6) needles – 9″ circular knitting needles.
- The stalk is knit flat – back and forth, not in the round.
Notions
- Tape measure
- Darning needle
- Scissors
Other Materials
- Toy stuffing – to fill the pumpkin
Abbreviations / Knitting Abbreviations And Terms (US And UK) List
- Approx = Approximately
- Beg = Begin(ning)
- Cont = Continue(ing)
- K = Knit
- P = Purl
- Rem = Remaining
- Rep = Repeat
- Rnd(s) = Round(s)
- St(s) = Stitch(es)
- St, St = Stocking stitch
Pattern Instructions
- Cast on 36 stitches, leaving a tail length of about 15″
- Divide the stitches onto your two needles (use the 4mm circular needles) and join being careful not to twist.
- *K5, P1* repeat until the knitting is about 3″ long.

- Break off the yarn and thread through the remaining stitches, pull them together tight, and secure them with a knot.
- Turn the right side out.
- Then stuff the mini pumpkin with the toy stuffing until it is nice and round.
- On the open end, thread your yarn through and pull it together to close the opening.
- Make a knot to hold it in place.
- Push the tail from the end so you have two lengths of yarn from one end.
- Tie the two tails together and wrap them around and around to form that pumpkin shape.
- Then knot to keep the shape.
- Weave the ends in.

The Stalk
For the stalk – use the 4 mm (US 6) needles and brown DK yarn.
This part is knit flat – back and forth on the needles, not in the round.
- Cast on 8 stitches
- Start with a knit row and work st st (stocking stitch) until the piece measures 1.5 inches (longer if you want!)
- Cast off.
- Stitch the stalk into place on the top of the pumpkin.
Crochet Pumpkins
If you prefer crocheting to knitting, you can also make a crochet version of your favorite fall decor.
Use your favorite orange yarn and crochet a cute little pumpkin for the fall season.
If you enjoy crochet or want to learn, making a pumpkin is a great project for practicing various crochet techniques.
You can experiment with different stitches, patterns, and embellishments to enhance your skills.
Creating your own pumpkins reduces the need for store-bought, disposable decorations, contributing to a more sustainable lifestyle.
Plus these crochet patterns are ideal for achieving the store-brought look, with a touch of homemade which makes everything more special.
Moreover, the color possibilities are endless you can make sweet little pumpkins in a traditional pumpkin spice color or in many different colors.
These crochet pumpkin patterns are perfect to make for Halloween and fall.
Share your work with us…
I love seeing your finished projects on social media.
If you enjoyed making the small pumpkin, I’d love to see yours on Instagram, be sure to tag me @handylittleme.
If you are on Facebook, stop over to the handylittleme Facebook page or join our Facebook group and share a photo.
I’d love to see your work.
Happy Knitting!
More Patterns You May Be Interested In…
- 20 Temperature Blanket Patterns (The Ultimate Guide)
- How To Knit A Hat With Circular Needles (Step-By-Step)
- 31 Free Baby Blanket Knitting Patterns (Easy Knit Blankets)
- How To Knit Baby Booties (Step-By-Step)
- Knitted Dog Sweater Pattern (3 Sizes)
- 12 Simple Knitting Stitches For Beginners
- Free Knitted Dishcloth Patterns
- 37+ Patterns To Use Up Your Yarn Stash (Small Projects)
- Free Dog Sweater Knitting Pattern (Straight Needles)
- Super Easy Corner To Corner Baby Blanket Pattern (Knit)
- Easy Baby Sweater Knitting Pattern For Beginners
- How To Knit A Baby Hat (Straight Needles)
- 8 Cable Stitch Knitting Patterns
- Free Knitted Heart Pattern (Easy + Quick Project)
- 20+ Fall Oversized Knits (Sweater Knitting Patterns)
- Ribbed Beanie Knitting Pattern (Unisex Mariner’s Hat)
Those are sweet wee pumpkins to knit. You have inspired me to put aside current project to make some for friends and neighbors, just because.
Hello Isabel,
I am so happy you want to make the pumpkins, they are great stash busters.
And what a great idea to give them to friends and neighbors.
Very thoughtful, I bet they will love them.
Happy knitting!
Louise