How To Knit A Christmas Stocking (Free Knitting Pattern)
THIS ARTICLE CONTAINS AFFILIATE LINKS THAT SUPPORT HANDY LITTLE ME CONTENT AND FREE PATTERNS.In this post, you will see how to knit a Christmas stocking, which is a quick-knit project.
This holiday stocking is knit with super bulky yarn, so it can fit many little gifts inside and create special memories for a family member on Christmas morning.
Please scroll down to view the step-by-step pattern or grab your inexpensive ad-free printable PDF from my shop here.

Christmas Stocking Knitting Pattern
Grab the inexpensive, ad-free, PDF printable pattern in my shop here.
Notes
The holiday season stocking knits up quickly in super bulky yarn and the simple design makes for a relaxing and enjoyable quick knit.
Chunky Christmas stockings are a great gift for every member of the family and can easily be personalized using knitted letters (search for an alphabet chart).
The top of the stocking is knit in K1, P1 ribbing, and the main body of the stocking is knit in what looks like stockinette stitch, but because this is knit in the round, you will knit every round to create that effect.
The heel flap is created by working short rows to shape.
You can use scrap yarn for the pom pom decorations.
TIP – If you want to make little stockings, you could follow this pattern but change your yarn and needle size – for example, using worsted weight yarn and hanging them on your Christmas trees.
Skill Level – Easy (A simple knit great for advanced beginners and the more experienced intermediate knitters)
Size – The finished size of the stocking is as follows;
- Height – From the top of cuff to heel = 12.5 inches / From the top of cuff to toe = 19 inches
- Width – From side of stocking to side = 6.5 inches / From toe to heel = 11 inches
Gauge = 10 sts / 14 rounds in 4 inches measured in pattern (stocking stitch).
Copyright Info
- Please do not copy, sell, redistribute, or republish this pattern.
- If you wish to share this pattern, link to the pattern page only.
- You may sell items produced using this pattern.
- Do NOT use copyrighted photos for your product listing.
- For the copyright T&C, please read my Terms of Use.
The Supplies You Need
Yarn
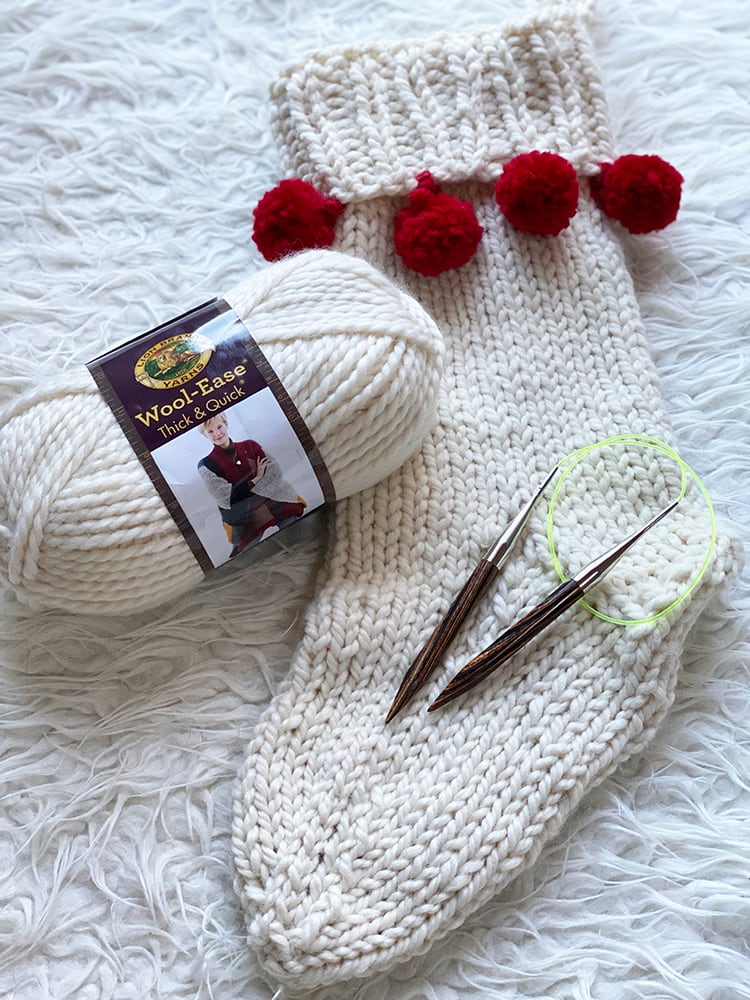
- 1 skein of Lion Brand Wool-Ease Thick and Quick (170g/106yd/97m) in the color Fisherman.
- This yarn is a wool/acrylic blend.
- Coordinating color for the pom poms – I used The Petite Wool from We Are Knitters in Red. You need around 40g or 50g for this.
- Any super bulky/super chunky/14 ply weight yarn.
- Yarn Weight Guide (+ Conversion Chart)
Needles
- 10 mm needles – (US 15) 20″ or 24″ circular knitting needles.
- I used my set of interchangeable circular needles.
- If you use a larger size cable you may have to use the magic loop technique when knitting. (View Tutorial – Magic loop knitting | step by step)
Notions
- Tape measure
- Darning needle/tapestry needle
- Scissors
- Stitch markers
Other Materials
- Clover pom maker – 1 3/8 inch / 35mm
- Add small pom poms for a personal touch.

Abbreviations
- Beg = Begin(ning)
- Cont = Continue(ing)
- K = Knit (knit stitch)
- K2tog = Knit 2 stitches together
- P = Purl
- P2tog = Purl 2 stitches together
- PM = Place marker
- Rem = Remaining
- Rep = Repeat
- Rnd(s) = Round(s)
- St(s) = Stitch(es)
- St St = Stockinette stitch
- SSK = Slip, slip knit – slip 2 stitches to your right needle, then transfer back to the left needle to knit together.
Free Pattern Instructions
Time needed: 3 hours and 30 minutes
Christmas Stocking Knitting Pattern
- Cast On
Cast on 30 sts.
Divide the stitches on the needles and prepare to work using the magic loop technique.
- Knit The Cuff
Next, you will knit the cuff with the right side facing you.
PM and join in the round being careful not to twist the sts.
Round 1: K1, P1 to the end of the round.
Continue to K1, P1 in 1×1 rib until the piece measures 4 inches from the CO edge. - Knit The Main Body Of The Stocking
Knit The Main Body Of The Stocking
Next round: Knit
Continue to knit every round until you have completed 40 rounds. - Knit The Heel Flap
*Place a stitch marker at each side of the piece, so you have 15 sts on either side.
P row – 15 sts only, turn,
K row, turn,
Rep until you have worked 6 rows of st st.
- Turn The Heel
Next, you will work a short-row heel.
Sl 1, P5, P2tog, P1, turn,
Sl 1, K1, SSK, K1, turn,
Sl 1, P2, P2tog, P1, turn,
Sl 1, K2, SSK, K1, turn,
Sl 1, P3, P2tog, P1, turn,
Sl 1, K3, SSK, K1, turn,
Sl 1, P4, P2tog, P1, turn,
Sl 1, K4, SSK, K1, turn,
Sl 1, P across the rem sts. - The Gusset
Cut yarn and rejoin to 1st st on the other needle.
Pick up and knit 8 sts along the gusset.
Knit 7 sts along the instep.
Pick up and knit 8 sts along the other side of the gusset.
Knit across the rem 15 sts to the end of the round (where the yarn joins).
PM at either side of the gusset (the sides of the piece if you have not done so already).
K1, SSK, K17, K2tog, K16.
Knit round.
K1, SSK, K16, K2tog, K15.
Knit round.
K1, SSK, K15, K2tog, K14.
Knit round.
K1, SSK, K14, K2tog, K13.
Knit round.
K1, SSK, K13, K2tog, K12. - The Foot
Knit in the round until you have completed 8 rounds.
- The Toe
K1, SSK, K10, K2tog, K2tog, K9, K2tog.
Knit round.
K1, SSK, K8, K2tog, K2tog, K7, K2tog.
Knit round.
K1, SSK, K6, K2tog, K2tog, K5, K2tog.
Knit round.
K1, SSK, K4, K2tog, K2tog, K3, K2tog.
Knit round.
K1, SSK, K2, K2tog, K2tog, K1, K2tog. - Graft The Toe
Graft the toe either using the Kitchener stitch, or you can cast off the rem 8 sts and seam using the mattress stitch.
Weave in any loose ends. - The Hanging Loop – Cast-on
CO 14 sts (knit flat – don’t join in the round).
Knit 1 row. - The Hanging Loop – Cast off
Cast off.
Cut yarn with a tail of 8″. - Attach the hanging loop to the stocking
Fold the loop in half and stitch, then attach it to the corner of the stocking and stitch it into place.
- Create and attach the pom poms
With your pom pom maker and colored yarn make 4 pom poms the same size, leaving a tail of around 8 inches.
Stitch the pom poms onto the front of the stocking cuff – along the edge using the tail of each pom pom to do this.
I spaced out each pom pom by 2 inches, starting at one end and then moving down to the other.
Your stocking is now ready to be hung up and filled with Christmas gifts!


Holiday Stockings
To make this stocking, you need to be able to knit in the round using circular needles.
Christmas is the perfect time to make your own Holiday stockings and have lots and lots of festive fun filling them up with little gifts and surprises.
Making handmade Christmas stockings to decorate your home could be just the project you need to get into the holiday spirit.

Make Your Own Chunky Hand-Knit Christmas Stocking
The best thing about handmade decorations is that they can be personalized, knit in your favorite color, and used again year after year.
This is an easy-level stocking pattern, so if you are an advanced beginner and haven’t knit socks before, this pattern will be great for you!
It is really quick and easy to make, knit in the round with size 10 mm needles (US 15) and uses super bulky yarn (06).

How Do You Knit A Christmas Stocking?
To knit this Christmas stocking, you will need one ball of Lion Brand Wool-Ease Thick and Quick in Fisherman and a pair of 10 mm (US 15) circular needles with a 20″ or 24″ cable.
You also need stitch markers, a tape measure, a darning needle, and a different colored yarn to make pom poms for decorating.
The stocking is knit simply using a beginner sock pattern; you must know how to knit, purl, work in the round, and decrease using K2tog and SSK.

How Much Yarn Do I Need To Make A Christmas Stocking?
I made this knit stocking using a super bulky weight (06)/super chunky/14 ply yarn – One skein of Lion Brand Wool-Ease Thick and Quick in Fisherman (170g/106yd/97m).
Any super bulky weight yarn 06 will be okay for this pattern.
There are many delicious colors in the Lion Brand Wool-Ease Thick and Quick yarns for you to choose from, but Fisherman is one of my favorite colors because it goes with everything!
How Long Does It Take To Knit A Christmas Stocking?
This Christmas stocking knits up super fast as you are using super bulky yarn and large needles.
I knit this up in the afternoon (around 3 hours) while watching a Christmas movie!
Handmade stockings are fantastic quick-knit projects, great for last-minute decorations or gifting.
Knitting Techniques and tutorials you may find helpful in following this pattern:
This pattern is great for any advanced beginner knitters.
If this is your first time knitting a festive stocking or big socks, this pattern is easy enough for those who have mastered knitting in the round on circular needles.
- Knitting cast-on methods
- Knitting Lessons
- How to cast on knitting
- How to cast off knitting for total beginners (step by step)
- How to knit garter stitch
- How to knit the purl stitch (for beginners + a video tutorial)
- How to knit stockinette stitch (for beginners)
- How to read knitting patterns for beginners
- Knitting abbreviations and terms (US and UK)
- How to knit rib stitch patterns (1×1 and 2×2 ribbing)
- How to knit two stitches together – K2tog
- How to join knitting in the round with circular knitting needles

More Christmas Knitting Patterns
- Mini Santa Stocking Knitting Pattern
- Dog Christmas Hat Pattern
- Knitted Elf Hat Pattern
- Knitted Santa Hat
- Free Merry Mini Stockings: Knit Christmas Socks
- Knit Tree Skirt Pattern (Free And Easy Christmas DIY)
- 28 Free Christmas Stocking Knitting Patterns (The Best)
- 13 Vintage Knitted Christmas Stocking Patterns
- Tartan Christmas Decorations (Plaid Knitting Pattern)
- The 50+ Best Free Knitted Gifts For Christmas
- Christmas Blanket Knitting Pattern (Free + Festive!)
- How To Make A Chunky Knit Pillow Cover- Free Pattern
- Holly Jolly Dishcloth Knitting Pattern (Free Printable)
- Candy Cane C2C Dishcloth (Free Printable Knitting Pattern)
- 17+ Nordic Knits For Christmas – Free Patterns
- 25 Free Knitted Christmas Baubles And Ornaments
- 15+ Free Knitted Advent Calendar Patterns
- Knitted Christmas Bauble Cover (Free Printable)
- 10 Free Christmas Tree Skirt Knitting Patterns
- Free Chunky Christmas Tree Skirt Knitting Pattern (Large Yarn)
- 13 Easy Knitted Wreaths For The Holidays!
- 15 Knitted Garlands For Christmas (Free + Easy)
- 17 Snowflake Knitting Patterns (Free + Festive)
- How To Make An Easy Pom Pom Christmas Tree DIY Craft
- How To Make A Christmas Wreath (Easy Homemade DIY)
- Elf Dog Sweater Knitting Pattern (Free in 3 Sizes)
- Christmas Elf Dog Bandana Knitting Pattern (4 Sizes)
- 17 Free Christmas Dishcloth Knitting Patterns (Festive + Fun!)
- 30 Quick Knitting Projects For Christmas Gifts
- 27 Knitted Stocking Stuffers (All Free Patterns!)
- Free Dog Hat Knitting Pattern (Bobble Hat With Ear Holes)

Could you share your work with us?
I love seeing your finished projects on social media.
If you enjoyed making the Christmas stocking, I’d love to see yours on Instagram, be sure to tag me @handylittleme.
I’d love to see your work.
Happy Knitting!
More Patterns You May Be Interested In…
- How To Knit A Hat For Complete Beginners (+ Video Tutorial)
- 20 Temperature Blanket Patterns (The Ultimate Guide)
- How To Knit A Hat With Circular Needles (Step-By-Step)
- 31 Free Baby Blanket Knitting Patterns (Easy Knit Blankets)
- How To Knit Baby Booties (Step-By-Step)
- Knitted Dog Sweater Pattern (3 Sizes)
- 12 Simple Knitting Stitches For Beginners
- Free Knitted Dishcloth Patterns
- 37+ Patterns To Use Up Your Yarn Stash (Small Projects)
- Free Dog Sweater Knitting Pattern (Straight Needles)
- Super Easy Corner To Corner Baby Blanket Pattern (Knit)
- Easy Baby Sweater Knitting Pattern For Beginners
- How To Knit A Baby Hat (Straight Needles)
- Pumpkin Knitting Pattern (Beginner Friendly!)
- 8 Cable Stitch Knitting Patterns
- Free Knitted Heart Pattern (Easy + Quick Project)
- 20+ Fall Oversized Knits (Sweater Knitting Patterns)
- Ribbed Beanie Knitting Pattern (Unisex Mariner’s Hat)